I really love Microsoft’s Cloud App Security tool. It is quickly becoming the one place I go to check all logs, as well as remediate any security issues with my Office 365 environments.
The hardest thing about this tool is out of the box it can be a little chatty- alerting you to too many things or not alerting you about the right things. One of the things I feel it doesn’t alert well on out of the box is admin elevations. This may be because Microsoft has other places they have standard alerts for this type of thing. But I really like having a single plane of glass for my security events and this is a big one I want to have visibility into. Below is a policy so you can add to be notified when admins are changed.
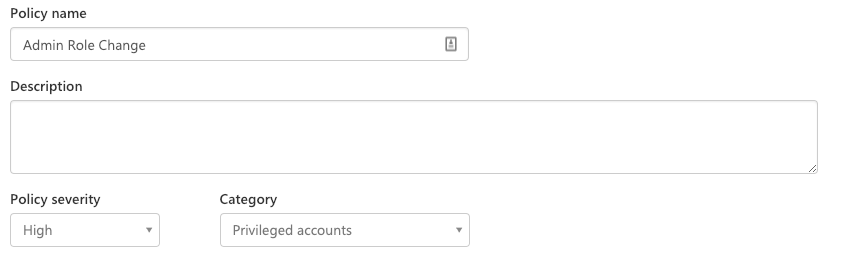
First, create a name and set the severity to high.
Next, we need to filter what activities, the ones I have found I want to be alerted on, is the following. These member roles are not well described from the drop down, but these are all the admin rights in Office 365. Security admin, billing admin, global admin, etc.. will trigger any time there is a change.
Once you have this set you can just save your policy and you are good to go. You should start seeing the alerts in the CAS portal anytime there is admin permission update.
And here is an extra tip- I like to be notified in real time, so with CAS you can elect to get text messages notifications about these alerts as well as in an email. This way you make sure you are aware and can take action as soon as a change happens.
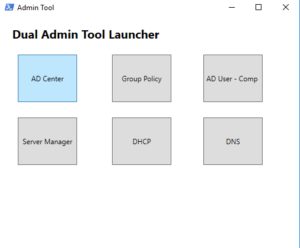
I Often find my self needing to open tools such as AD or DNS as a different user account. This is because as a security best practices I usually recommend organizations run dual account security. Where an IT team member uses a separate account for admin activity vs their day to day account that has email. This is a great way to increase security and limit your exposure. However, it often can prove to be a productivity killer for IT teams. As each tool such as AD or DHCP needs to be run as a different user, or you need to have a jump box to do administration.
To avoid this issue I went and wrote a powershell script to help launch your admin utilities as another account.
I customized this one to allow any one to customize the app launcher to run any tools or commands you need it to. When it launches you will have simple way to start all your admin tools as another account. The Caveat, is you have to launch powershell once as a different user. This works for me since I almost always have powershell open.
To get started with this script you will need to create a shortcut with the run as command and that launches powershell. And then simply add the following scripts to your profile and then you will have a customizable Launcher.
When its time to setup an AD password policy for your company you are going to google the process and you are going to find 1 Million ways to enforce passwords. Unfortunately most of the ways that are listed there are really geared toward older options Pre 2008 Active Directory. Most involve trying to use group policy, and are way more difficult to deploy than they need to be. And of course they never mention the gotchas, of turning on password policy in a existing environment, and then unceremoniously locking out all your users at the same time.( I mention it for a friend, Seriously it wasn’t me I don’t know what you are talking about)
Turning on Password Policy’s
If you are turning on password policy’s for users. You should be doing it with Fine Tune Password Policy’s. Its the Easiest and most flexible way to deploy password policy’s. This is because you are able to set a hierarchy and have more stringent password policy’s deploy to users.
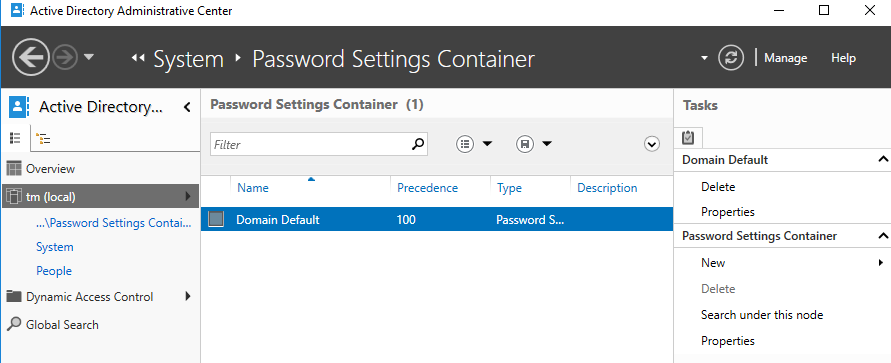
To deploy this you will want to launch Active Directory Administrative Center(ADAC). ADAC was deployed with Server 2012/ Win 8 and makes setting up these policy’s very easy. Next go to System > Password Settings Container.
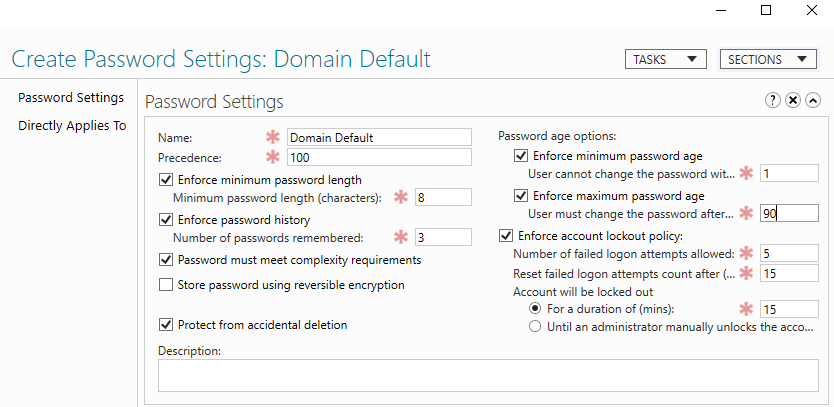
On the right hit New, Password Setting. From here you can set all of your compliance requirements and build out any precedent policy’s. For instance, I like to have Domain Admins, and Service Accounts to have more strict password policy’s. With the Domain Default applying to all domain users.
Avoiding the Gotchas
Once you have your policy created, Apply it to a test user, but not the whole Domain users group. Next we need to do some digging before applying this to a existing domain, because if you apply this to an existing account it will automatically take effect based on the last password set, not based on when this policy was applied. Meaning you can potentially lock out all your users. I didn’t actually run into this problem, mostly because my predecessors did this and then gave up on deploying passwords.
So to avoid this we need to do some digging and figure out who is going to be effected. To Find this out we will use powershell to get some ad Attributes.
This will create a spreadsheet with the list of users, and the last time there passwords were set, if there password is expired, and if they are set to manually never expire. From this we can determine who will be locked out if we are implementing a 90 day password policy, and if there are any users we need to remove password exemptions.
If you are implementing a password policy for the first time in a large company, it may be impractical to simply let users know they need to change there password. Instead you can use powershell to reset there last password date to today’s date, giving them an additional 90 day’s before there password expires. Unfortunately there is no built in way to just manually set last password date. So we have to trick the system in to resting the last set date to today. The following code, sets the password last set date to 0 then -1 which tricks it into setting it to today.
After you have done your testing to make sure you wont lock people out you will need to apply this same process to all your users. Below is a script that looks to see if any one password was set less the 90 days ago or if they have an account the is manually set to never expire. Removes it and sets there last password date to day. Please run at your own caution and after thoroughly testing in your environment
$users = get-aduser -Filter * -Properties passwordlastset, passwordneverexpires, PasswordExpired -SearchBase "Add an OU pathe to your users so you dont apply this to service accounts"
$expirationdate = $(Get-Date).AddDays(-90)

foreach($user in $users){
 if ($user.PasswordNeverExpires -eq "True" -or $user.passwordlastset -lt $expirationdate)
    {
    $user
    $user.pwdLastSet = 0
    Set-ADUser -Instance $user
    $user.pwdLastSet = -1
    Set-ADUser -Instance $user
    get-aduser $user | Set-ADAccountControl -PasswordNeverExpires:$false

    }
}
Once this is run, simply apply your password container to Domain Users and then you are set.
Ever run into a user request where they need you to update a distribution list with users that are not on your system? No Problem you say, only to discover its a excel spread sheet with 100 or more people. AGH….
PowerShell to the rescue.
Here is a script I used to create and add mail contacts to a 365 Distribution list in mass. This code assumes 2 things. 1st you have csv with with columns named ‘CONTACT NAME’ and ‘E-MAIL’, 2nd you have already connected to Exchange online.
Thats it, simple easy. In this script we are checking if the there is already a contact, if no we go and create it and add it to our group. If the contact is already in Exchange we simply just add it.
Thanks everyone so much for showing up and checking out my new blog. Content on here is mostly going to be about my journey though Technology and the various pieces of tech I am working on and fixing.
Most likely I wont post a ton on here and it will be mostly what is cool that i am learning. or most likely stuff I cant remember and post here so I don’t have to remember it.
Who am I?
Well I am just your ordinary every day IT Guy. Trying to help one organization after the next succeed with technology. I Primarily focus on Microsoft Cloud technology and and have lots of experience rolling out these products to company’s. Not just an implement and leave kind of roll out, but deep level training and building to help company’s to take advantage of these products that they can use everyday.
I am just here for the Journey. If you want to reach out to me email me at @dougsbaker