Conditional Access Policy Exporter

I perform best practice audits of customers’ Conditional Access (CA) policies on a regular basis. If you have ever done this, you will quickly notice that it can be a very intensive exercise due to Azure AD’s portal design. When customers only have a handful of CA policies it can be very easy and quick. However, when reviewing many policies it can quickly become impossible and overwhelming. When having to expand out every policy and sub config, it’s easy to forget all the options and what each policy did.

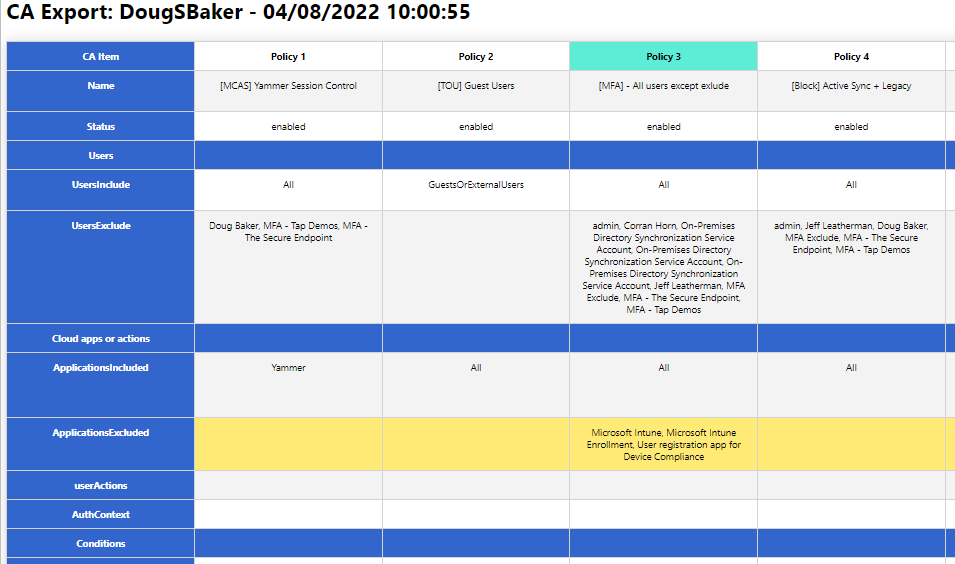
So to help with this, I wrote a Powershell script to help export these into an easier-to-audit and human-readable format. You might say, “But Doug, there are plenty of other options for exporting!” While this may be true, most of the options I found relied on GraphAPI calls that have proven difficult for clients to set up. Additionally, many of the outputs for these scripts did not help make my analysis easier. So the script below relies only on the Azure AD PowerShell module and hopefully makes it easier to read the policy configs.

Hope this helps you, and if it does send me a note and let me know. @Dougsbaker

CA-Export/Export-CaPolicy.v1.ps1 at main · dougsbaker/CA-Export (github.com)

Script Features

  • Only Requires AzureAD PowerShell Module
  • Exports to HTML Grid View
  • Ability to highlight Control / Condition

Features I am considering adding

  • Moveable Columns / Filters to hide
  • Multiple output formats
  • Export/Restore option

<#
	.SYNOPSIS
		Conditional Access Export Utility
	.DESCRIPTION
       Exports CA Policy to HTML Format for auditing/historical purposes. 

	.NOTES
		Douglas Baker
		@dougsbaker


        ############################################################################
        This sample script is not supported under any standard support program or service. 
        This sample script is provided AS IS without warranty of any kind. 
        This work is licensed under a Creative Commons Attribution 4.0 International License
        https://creativecommons.org/licenses/by-nc-sa/4.0/
        ############################################################################    
	
#>

#ExportLocation
$ExportLocation = "C:\scripts\"
$FileName = "CAPolicy.html"


$HTMLExport = $true

#Connect-AzureAD

try {
    Get-AzureADMSConditionalAccessPolicy -ErrorAction Stop > $null
    Write-host "Connected: AzureAD"
  }
  catch {
    Write-host "Connecting: AzureAD"  
   Try {
    Connect-AzureAD
   }
   Catch
   {
       Write-host "Error: Please Install AzureAD Module"
       Write-Host "Run: Install-module AzureAD"
   }
}
  
#Collect CA Policy
Write-host "Exporting: CA Policy"
$CAPolicy = Get-AzureADMSConditionalAccessPolicy
$TenantData = Get-AzureADTenantDetail
$TenantName = $TenantData.DisplayName


$date = Get-Date

$CAExport = [PSCustomObject]@()

$AdUsers = @()
$Apps = @()
#Extract Values
Write-host "Extracting: CA Policy Data"
foreach( $Policy in $CAPolicy)
{

    $IncludeUG = $null
    $IncludeUG = $Policy.Conditions.Users.IncludeUsers
    $IncludeUG +=$Policy.Conditions.Users.IncludeGroups
    $IncludeUG +=$Policy.Conditions.Users.IncludeRoles


    $ExcludeUG = $null
    $ExcludeUG = $Policy.Conditions.Users.ExcludeUsers
    $ExcludeUG +=$Policy.Conditions.Users.ExcludeGroups
    $ExcludeUG +=$Policy.Conditions.Users.ExcludeRoles
    
    
    $Apps += $Policy.Conditions.Applications.IncludeApplications
    $Apps += $Policy.Conditions.Applications.ExcludeApplications

    
    $AdUsers +=$ExcludeUG
    $AdUsers +=$IncludeUG
    
    $InclLocation = $Null
    $ExclLocation = $Null 
    $InclLocation = $Policy.Conditions.Locations.includelocations
    $ExclLocation = $Policy.Conditions.Locations.Excludelocations

    $InclPlat = $Null
    $ExclPlat = $Null 
    $InclPlat = $Policy.Conditions.Platforms.IncludePlatforms
    $ExclPlat = $Policy.Conditions.Platforms.ExcludePlatforms
    $InclDev = $null
    $ExclDev = $null
    $InclDev = $Policy.Conditions.Devices.IncludeDevices
    $ExclDev = $Policy.Conditions.Devices.ExcludeDevices
    $devFilters = $null
    $devFilters = $Policy.Conditions.Devices.DeviceFilter

    $CAExport += New-Object PSObject -Property @{ 
        Name = $Policy.DisplayName;
        Status = $Policy.State;
        Users = "";
        UsersInclude = ($IncludeUG -join ", `r`n");
        UsersExclude = ($ExcludeUG -join ", `r`n");
        'Cloud apps or actions' ="";
        ApplicationsIncluded = ($Policy.Conditions.Applications.IncludeApplications -join ", `r`n");
        ApplicationsExcluded = ($Policy.Conditions.Applications.ExcludeApplications -join ", `r`n");
        userActions = ($Policy.Conditions.Applications.IncludeUserActions -join ", `r`n");
        AuthContext = ($Policy.Conditions.Applications.IncludeAuthenticationContextClassReferences -join ", `r`n");
        Conditions = "";
        UserRisk = ($Policy.Conditions.UserRiskLevels -join ", `r`n");
        SignInRisk = ($Policy.Conditions.SignInRiskLevels -join ", `r`n");
       # Platforms = $Policy.Conditions.Platforms;
        PlatformsInclude =  ($InclPlat -join ", `r`n");
        PlatformsExclude =  ($ExclPlat -join ", `r`n");
       # Locations = $Policy.Conditions.Locations;
        LocationsIncluded = ($InclLocation -join ", `r`n");
        LocationsExcluded = ($ExclLocation -join ", `r`n");
        ClientApps = ($Policy.Conditions.ClientAppTypes -join ", `r`n");
       # Devices = $Policy.Conditions.Devices;
        DevicesIncluded = ($InclDev -join ", `r`n");
        DevicesExcluded = ($ExclDev -join ", `r`n");
        DeviceFilters =($devFilters -join ", `r`n");
        'Access Controls' = "";
     #   Grant = ($Policy.GrantControls.BuiltInControls -join ", `r`n");
        Block = if ($Policy.GrantControls.BuiltInControls -contains "Block") { "True"} else { ""}
        'Require MFA' = if ($Policy.GrantControls.BuiltInControls -contains "Mfa") { "True"} else { ""}
        'CompliantDevice' = if ($Policy.GrantControls.BuiltInControls -contains "CompliantDevice") { "True"} else { ""}
        'DomainJoinedDevice'  = if ($Policy.GrantControls.BuiltInControls -contains "DomainJoinedDevice") { "True"} else { ""}
        'CompliantApplication' = if ($Policy.GrantControls.BuiltInControls -contains "CompliantApplication") { "True"} else { ""}
        'ApprovedApplication'  = if ($Policy.GrantControls.BuiltInControls -contains "ApprovedApplication") { "True"} else { ""}
        'PasswordChange' = if ($Policy.GrantControls.BuiltInControls -contains "PasswordChange") { "True"} else { ""}
        TermsOfUse = if ($Policy.GrantControls.TermsOfUse -ne $null) {"True"} else {""};
        CustomControls =  if ($Policy.GrantControls.CustomAuthenticationFactors -ne $null) {"True"} else {""};
        GrantOperator = $Policy.GrantControls._Operator
       # Session = $Policy.SessionControls
        ApplicationEnforcedRestrictions = $Policy.SessionControls.ApplicationEnforcedRestrictions.IsEnabled
        CloudAppSecurity                = $Policy.SessionControls.CloudAppSecurity.IsEnabled
        PersistentBrowser               = $Policy.SessionControls.PersistentBrowser.Mode
        SignInFrequency                 = "$($Policy.SessionControls.SignInFrequency.Value) $($conditionalAccessPolicy.SessionControls.SignInFrequency.Type)"
    }
  
    
}

#Swith user/group Guid to display names
    Write-host "Converting: AzureAD Guid"
    #Filter out Objects
    $ADsearch = $AdUsers | Where-Object {$_ -ne 'All' -and $_ -ne 'GuestsOrExternalUsers' -and $_ -ne 'None'}
    $cajson =  $CAExport | ConvertTo-Json -Depth 4
    $AdNames =@{}
    Get-AzureADObjectByObjectId -ObjectIds $ADsearch |ForEach-Object{ 
        $obj = $_.ObjectId
        $disp = $_.DisplayName
        $AdNames.$obj=$disp
        $cajson = $cajson -replace "$obj", "$disp"
    }
    $CAExport = $cajson |ConvertFrom-Json
#Switch Apps Guid with Display names
     $allApps =  Get-AzureADServicePrincipal -All $true 
   $allApps | Where-Object{ $_.AppId -in $Apps} | ForEach-Object{
       $obj = $_.AppId
       $disp =$_.DisplayName
       $cajson = $cajson -replace "$obj", "$disp"
   }
#switch named location Guid for Display Names
    Get-AzureADMSNamedLocationPolicy| ForEach-Object{
        $obj = $_.Id
        $disp =$_.DisplayName
        $cajson = $cajson -replace "$obj", "$disp"
    }
#Switch Roles Guid to Names
    Get-AzureADDirectoryRole| ForEach-Object{
        $obj = $_.RoleTemplateId
        $disp =$_.DisplayName
        $cajson = $cajson -replace "$obj", "$disp"
    }
   $CAExport = $cajson |ConvertFrom-Json

#Export Setup
    Write-host "Pivoting: CA to Export Format"
    $pivot = @()
    $rowItem = New-Object PSObject
    $rowitem | Add-Member -type NoteProperty -Name 'CA Item' -Value "row1"
    $Pcount = 1
    foreach($CA in $CAExport)
    {
        $rowitem | Add-Member -type NoteProperty -Name "Policy $pcount" -Value "row1"
                #$ca.Name
                $pcount += 1
    }
    $pivot += $rowItem
  #  $pivot | Out-GridView
#Add Data to Report
$Rows = $CAExport | Get-Member | Where-Object {$_.MemberType -eq "NoteProperty"}
$Rows| ForEach-Object{
    $rowItem = New-Object PSObject
    $rowname = $_.Name
    $rowitem | Add-Member -type NoteProperty -Name 'CA Item' -Value $_.Name
    $Pcount = 1
    foreach($CA in $CAExport)
    {
        $ca | Get-Member | Where-Object {$_.MemberType -eq "NoteProperty"} | ForEach-Object {
            $a = $_.name
            $b = $ca.$a
            if ($a -eq $rowname) {
              $rowitem | Add-Member -type NoteProperty -Name "Policy $pcount" -Value $b  
            }
            
        }
      # $ca.UsersInclude
      $pcount += 1
    }
    $pivot += $rowItem
}
#Set Row Order
$sort = "Name","Status","Users","UsersInclude","UsersExclude","Cloud apps or actions", "ApplicationsIncluded","ApplicationsExcluded",`
        "userActions","AuthContext","Conditions", "UserRisk","SignInRisk","PlatformsInclude","PlatformsExclude","ClientApps", "LocationsIncluded",`
        "LocationsExcluded","Devices","DevicesIncluded","DevicesExcluded","DeviceFilters", "Access Controls", "Block", "Require MFA", "CompliantDevice",`
        "DomainJoinedDevice","CompliantApplication", "ApprovedApplication","PasswordChange", "TermsOfUse", "CustomControls", "GrantOperator", `
        "Session","ApplicationEnforcedRestrictions", "CloudAppSecurity", "PersistentBrowser", "SignInFrequency"


if ($HTMLExport) {
    Write-host "Saving to File: HTML"
$jquery = '  <script src="https://ajax.googleapis.com/ajax/libs/jquery/3.5.1/jquery.min.js"></script>
    <script>
    $(document).ready(function(){
        $("tr").click(function(){
        if(!$(this).hasClass("selected")){
            $(this).addClass("selected");
        } else {
            $(this).removeClass("selected");
        }

        });
        $("th").click(function(){
        if(!$(this).hasClass("colselected")){
            $(this).addClass("colselected");
        } else {
            $(this).removeClass("colselected");
        }

        });
    });
    </script>'
$html = "<html><head><base href='https://docs.microsoft.com/' target='_blank'>
                $jquery<style>
                .title{
                    display: block;
                    font-size: 2em;
                    margin-block-start: 0.67em;
                    margin-block-end: 0.67em;
                    margin-inline-start: 0px;
                    margin-inline-end: 0px;
                    font-weight: bold;
                    font-family: Segoe UI;
                    
                }
                table{
                    border-collapse: collapse;
                    margin: 25px 0;
                    font-size: 0.9em;
                    font-family: Segoe UI;
                    min-width: 400px;
                    box-shadow: 0 0 20px rgba(0, 0, 0, 0.15) ;
                    text-align: center;
               }
                thead tr {
                    background-color: #009879;
                    color: #ffffff;
                    text-align: left;
               }
                th, td {
                    min-width: 250px;
                    padding: 12px 15px;
                    border: 1px solid lightgray;
                    vertical-align: top;
               }
               
                td {
                    vertical-align: top;
               }
                tbody tr {
                    border-bottom: 1px solid #dddddd;
               }
                tbody tr:nth-of-type(even) {
                    background-color: #f3f3f3;
               }
               tbody tr:nth-of-type(4), tbody tr:nth-of-type(7), tbody tr:nth-of-type(12), tbody tr:nth-of-type(23){
                    background-color: #36c;
                    text-aling:left !important
                }
                tbody tr:last-of-type {
                    border-bottom: 2px solid #009879;
               }
               tr:hover{
                background-color: #ffea76!important;
            }
            
            .selected:not(th){
                background-color:#ffea76!important;
                
                }
                th{
                   background-color:white !important;
                }
                .colselected {
              
              background-color: rgb(93, 236, 213)!important;
              
              }
              table tr th:first-child,table tr td:first-child {
                    position: sticky;
                    inset-inline-start: 0; 
                    background-color: #36c!important;
                    Color: #fff;
                    font-weight: bolder;
                    text-align: center;
               }
                </style></head><body> <div class='Title'>CA Export: $Tenantname - $Date </div>"
                

    Write-host "Launching: Web Browser"           
    $Launch = $ExportLocation+$FileName
    $HTML += $pivot  | Where-Object {$_."CA Item" -ne 'row1' } | Sort-object { $sort.IndexOf($_."CA Item") }| convertto-html -Fragment
    $HTML | Out-File $Launch
        start-process $Launch
}

Should I Integrate SharePoint sharing with Azure AD B2B

I was recently looking at new options available for controlling SharePoint and ran in into an interesting new feature I have never deployed. Specifically the Azure AD B2B integration with SharePoint and OneDrive. Azure AD B2B integration for SharePoint & OneDrive – SharePoint in Microsoft 365 | Microsoft Docs

Seems like an easy enough feature to turn on. Just 2 lines of PowerShell and I am set. But the big question I struggled with when researching this was should I enable this for my tenant? When I do what will be the change in the user experience? Are there any issues/got ya’s when this is enabled? Below I attempt to explorer those questions so you don’t have to.

Long Story Short: You should probably turn the feature on. From a security perspective, you should definitely turn this on. For your guests, it will be a little more cumbersome, but I think the security controls win out. Finally, If you do turn it on I would definitely also integrate AzureAD to support External Identity providers. This will let your users sign in with their external Identity instead of relying on Passcode via email.

Security Benefit: If you enable the B2B integration, you will immediately get a better set of security controls over your guests. The biggest call out is that once you have enabled this, guests are subject to CA policy and all the controls we can do in CA. The largest of these control wins is the ability to MFA these guests. I was surprised to find out that accounts that did not have an AzureAD back(Gmail yahoo etc) defaulted to passcode over email and did not require MFA. The other win inside CA is you can require Terms of Service, this is especially helpful if you need a way for guests to provide consent for GDPR purposes.

Gotchas: The biggest gotcha I can see so far with enabling this is now these guests will show up in Azure AD. Previously if just using the SPO Experience they did not. So if you enable this you will probably get an influx of guests that begin showing in Azure AD. So we need to make sure we have Access Reviews / a cleanup process running regularly to remove these users.

Guest User Experience: Below you will find a side-by-side comparison of the user experience. Overall for a guest, it is a slower experience, Especially if you have Conditional Access Policies in place requiring MFA. Again if you decide to move forward with the Azure AD B2B, consider also enabling External Identity providers.

Default ExperienceAzure AD B2B Enabled


Endpoint DLP PreReq Check

Looking to implement Microsoft’s Endpoint DLP? Concerned you haven’t met the prereqs for deployment? If you have that question then the first place you should check is the Edge URL’s. Microsoft has added a great little utility to help you identify the status of various DLP Utilities. Specifically in this case to check EndPoint DLP status you should visit edge://edge-dlp-internals/

Now, this is a great quick way to identify the status. However, it doesn’t really give us much info on what pre-req is making the product unavailable. I needed this detail recently so I wrote a quick PowerShell script to verify if my endpoint has met the pre-req’s and which one it failed on. If it helps you out Awesome! If it gives you an error let me know so I can help make the script better.

#===========================================================================
# Program: Check Defender status for Endpoint DLP
# Author: Douglas Baker
# Date: 2021-08-26
# Version : 1.0
# Note: https://docs.microsoft.com/en-us/microsoft-365/compliance/endpoint-dlp-getting-started?view=o365-worldwide#prepare-your-endpoints
#
#===========================================================================
#

write-host "Checking Prerequisits for Endpoint DLP"-ForegroundColor Green 
Write-Host "==========================================================" -ForegroundColor Green

$DefenderStatus = Get-MpPreference
$DefenderVersion = Get-MpComputerStatus

if ($DefenderStatus.DisableRealtimeMonitoring -eq $true) {
    Write-Host "Defender Real Time Monitoring is disabled, please enable before using Endpoint DLP" -ForegroundColor Red
} else {
    Write-Host "Defender Real Time Monitoring is enabled" -ForegroundColor Green
}
if ($DefenderStatus.DisableBehaviorMonitoring -eq $true) {
    Write-Host "Defender Behavior Monitoring is disabled, please enable before using Endpoint DLP" -ForegroundColor Red
} Else {
    Write-Host "Defender Behavior Monitoring is enabled" -ForegroundColor Green
}
if ([version]::Parse($DefenderVersion.AMServiceVersion) -le [version]::Parse('4.18.2009.7') ) {
    Write-Host "Defender AV needs to be updated, please updated AM client before using Endpoint DLP" -ForegroundColor Red
} else {
    Write-Host "Defender AV is on version that is supported by Endpoint DLP" -ForegroundColor Green
}
if( [Environment]::OSVersion.Version -lt (new-object 'Version' 10,0,17686) ) {
    write-host "Windows needs to be updated at least version 10x64 Build 1809" -ForegroundColor Red
} else {
    Write-Host "Windows is updated to a supported version" -ForegroundColor Green
}

$dsregcmd = dsregcmd /status
$aad = New-Object -TypeName PSObject
$dsregcmd | Select-String -Pattern " *[A-z]+ : [A-z]+ *" | ForEach-Object {
          Add-Member -InputObject $aad -MemberType NoteProperty -Name (([String]$_).Trim() -split " : ")[0] -Value (([String]$_).Trim() -split " : ")[1] -ErrorAction SilentlyContinue
     }

if ($aad.azureadjoined -eq "no") {
    Write-Host "Windows must be AzureAdJoined for Endpoint DLp to work. Please Join the device to Azure AD" -ForegroundColor Red
} else {
    Write-Host "Windows is AzureAdJoined" -ForegroundColor green
}

Deploy MDATP Tags with Intune

Do you feel its a little funny that Microsoft doesn’t have a built-in way to deploy MDATP tags Via Intune? Well, so do I! To get around this weakness I went and wrote a little Powershell script to help take care of it. Deploy it via intune script policy and you should be set/manage any regional tags you want in MDATP via intune.

Shout out to the Microsoft Scripting Guy Ed Wilson for the base code to update the values. https://devblogs.microsoft.com/scripting/update-or-add-registry-key-value-with-powershell/

$registryPath = "HKLM:SOFTWARE\Policies\Microsoft\Windows Advanced Threat Protection\DeviceTagging\"

$Name = "Group"
$value = "PowerShellTag"

IF(!(Test-Path $registryPath))

  {
    New-Item -Path $registryPath -Force | Out-Null
    New-ItemProperty -Path $registryPath -Name $name -Value $value -PropertyType String -Force | Out-Null}

 ELSE {
    New-ItemProperty -Path $registryPath -Name $name -Value $value -PropertyType string -Force | Out-Null}
Intune Settings

Let me know if there is an easier way to do this.

MDATP Portal

Export Azure backups in VHD format

Have you ever run into an issue where you need to export a backup of an Azure vm? No? Just me? Okay, well It can be a pain because there is no native way to just get the VHD of the backup file. If you want to restore a backup point, it’s no problem. If you want to clone a machine, no problem! Export a backup that you have already taken, well now that is a lot of work!

The trouble is due to how managed disks work in Azure. Since I am running machines with managed disks, when you restore the backup it retains that format and is only in a format that can be used by Azure. You may have noticed that if you ever pull up Azure file explorer you can’t see any of your vm’s disks, so to get around that you have to convert your managed disks to VHD and copy them to a new storage account.

Here is the hard thing, there is no way in the GUI to do this you have to use power shell if you want to get this to work. Lucky for you here is how you can do it without coming up with another option.

1st go into your Azure backups and restore a backup point. Here you want to create a new restore disk. Make sure to select the

2nd create a new blob you want to copy the VHD exports to. Once created you will need to determine the storage account Name, Container Name, and keys for the blob you plan on using.

You can find most of this info in your storage account.

3rd connect to your Azure environment via power shell.

At this point we need to identify the name or names of the restored disks we want to convert or export.

Use the following script to identify there name based on their creation date.

Connect-AzureRmAccount
get-azurermdisk | sort-object -property timecreated | ft name, TimeCreated

Finally we just need to put it all together and we can export these to our blob and then use storage explorer to download the files.

$disks = 'Disk1','Disk2'
$resourcegroup = 'enter the managed disk resource group name'

foreach ( $diskname in $disks){
$diskname
Get-AzureRmDisk -DiskName $diskname -ResourceGroupName $resourcegroup
$SAS = Grant-AzureRmDiskAccess -DiskName $diskname -ResourceGroupName $resourcegroup -DurationInSecond 58600 -Access Read
# Get the destination details
$storageAccountName = "##theNameof yourBlob##"
$storageContainerName = "##vhd##"
$destinationVHDFileName = $diskname
$storageAccountKey = "##yourkey##"
$destinationContext = New-AzureStorageContext –StorageAccountName $storageAccountName -StorageAccountKey $storageAccountKey
$sas.AccessSAS
# copy the vhd
Start-AzureStorageBlobCopy -AbsoluteUri $sas.AccessSAS -DestContainer $storageContainerName -DestContext $destinationContext -DestBlob $destinationVHDFileName
}

If you are in a time crunch you can monitor the status of the export by using the following code.

foreach ( $diskname in $disks){
$status = Get-AzureStorageBlobCopyState -Blob $destinationVHDFileName -Container $storageContainerName -Context $destinationContext
$percentage = $status.BytesCopied/$status.TotalBytes*100
$percentage = "{0:N2}" -f $percentage
Write-Host -ForegroundColor Yellow "$percentage completed!"
}

Powershell admin tool launcher

I Often find my self needing to open tools such as AD or DNS as a different user account. This is because as a security best practices I usually recommend organizations run dual account security. Where an IT team member uses a separate account for admin activity vs their day to day account that has email. This is a great way to increase security and limit your exposure. However, it often can prove to be a productivity killer for IT teams. As each tool such as AD or DHCP needs to be run as a different user, or you need to have a jump box to do administration.

To avoid this issue I went and wrote a powershell script to help launch your admin utilities as another account. 

I customized this one to allow any one to customize the app launcher to run any tools or commands you need it to. When it launches you will have simple way to start all your admin tools as another account. The Caveat, is you have to launch powershell once as a different user. This works for me since I almost always have powershell open. 

To get started with this script you will need to create a shortcut with the run as command and that launches powershell. And then simply add the following scripts to your profile and then you will have a customizable Launcher.

function Start-AdminTools { #=========================================================================== # Modify Tile names and programs you want run #=========================================================================== $buttonTitle1 = "AD Center" $buttonTitle2 = "Group Policy" $buttonTitle3 = "AD User - Comp" $buttonTitle4 = "Server Manager" $buttonTitle5 = "DHCP" $buttonTitle6 = "DNS" $launchapp1 = "C:\WINDOWS\system32\dsac.exe" $launchapp2 = "gpmc.msc" $launchapp3 = "dsa.msc" $launchapp4 = "servermanager" $launchapp5 = "dhcpmgmt.msc" $launchapp6 = "dnsmgmt.msc" #=========================================================================== # Xaml Script for GUI Interface #=========================================================================== $inputXML = @"

Deploying Password Policy’s

When its time to setup an AD password policy for your company you are going to google the process and you are going to find 1 Million ways to enforce passwords. Unfortunately most of the ways that are listed there are really geared toward older options Pre 2008 Active Directory. Most involve trying to use group policy, and are way more difficult to deploy than they need to be. And of course they never mention the gotchas, of turning on password policy in a existing environment, and then unceremoniously locking out all your users at the same time.( I mention it for a friend, Seriously it wasn’t me I don’t know what you are talking about)

Turning on Password Policy’s

If you are turning on password policy’s for users. You should be doing it with Fine Tune Password Policy’s. Its the Easiest and most flexible way to deploy password policy’s. This is because you are able to set a hierarchy and have more stringent password policy’s deploy to users. 

To deploy this you will want to launch Active Directory Administrative Center(ADAC). ADAC was deployed with Server 2012/ Win 8 and makes setting up these policy’s very easy. Next go to System > Password Settings Container.

On the right hit New, Password Setting. From here you can set all of your compliance requirements and build out any precedent policy’s. For instance, I like to have Domain Admins, and Service Accounts to have more strict password policy’s. With the Domain Default applying to all domain users. 

Avoiding the Gotchas

Once you have your policy created, Apply it to a test user, but not the whole Domain users group. Next we need to do some digging before applying this to a existing domain, because if you apply this to an existing account it will automatically take effect based on the last password set, not based on when this policy was applied. Meaning you can potentially lock out all your users. I didn’t actually run into this problem, mostly because my predecessors did this and then gave up on deploying passwords. 

So to avoid this we need to do some digging and figure out who is going to be effected. To Find this out we will use powershell to get some ad Attributes. 

get-aduser -Filter * -Properties passwordlastset, passwordneverexpires, PasswordExpired | Export-Csv "PaswordExp.csv"

This will create a spreadsheet with the list of users, and the last time there passwords were set, if there password is expired, and if they are set to manually never expire. From this we can determine who will be locked out if we are implementing a 90 day password policy, and if there are any users we need to remove password exemptions. 

If you are implementing a password policy for the first time in a large company, it may be impractical to simply let users know they need to change there password. Instead you can use powershell to reset there last password date to today’s date, giving them an additional 90 day’s before there password expires. Unfortunately there is no built in way to just manually set last password date. So we have to trick the system in to resting the last set date to today. The following code, sets the password last set date to 0 then -1 which tricks it into setting it to today. 

$user = get-aduser username -Properties passwordlastset, passwordneverexpires, PasswordExpired $user.pwdLastSet = 0 Set-ADUser -Instance $user $user.pwdLastSet = -1 Set-ADUser -Instance $user

Pulling it all together

After you have done your testing to make sure you wont lock people out you will need to apply this same process to all your users. Below is a script that looks to see if any one password was set less the 90 days ago or if they have an account the is manually set to never expire. Removes it and sets there last password date to day. Please run at your own caution and after thoroughly testing in your environment

$users = get-aduser -Filter * -Properties passwordlastset, passwordneverexpires, PasswordExpired -SearchBase "Add an OU pathe to your users so you dont apply this to service accounts" $expirationdate = $(Get-Date).AddDays(-90) foreach($user in $users){ if ($user.PasswordNeverExpires -eq "True" -or $user.passwordlastset -lt $expirationdate) { $user $user.pwdLastSet = 0 Set-ADUser -Instance $user $user.pwdLastSet = -1 Set-ADUser -Instance $user get-aduser $user | Set-ADAccountControl -PasswordNeverExpires:$false } }

Once this is run, simply apply your password container to Domain Users and then you are set.