DLP Next Steps – User Education Mode

So you have analyzed the results of your monitor policy and are ready to move forward. In this video, I discuss setting up notifications to help alert your users they are about to share sensitive info.

Microsoft Documentation Rescources.
Custom Notifications:
https://docs.microsoft.com/en-us/microsoft-365/compliance/use-notifications-and-policy-tips?view=o365-worldwide#custom-email-notification

If your policy Tips are not showing there can be several Gotchas, see this link for some of the scenarios that can prevent them from showing.
https://docs.microsoft.com/en-us/office365/troubleshoot/data-loss-prevention/data-loss-prevention-policy-tips

Build your first Microsoft Purview DLP Policy

Getting started with Microsoft Purview? Looking to build out your first DLP policy? In this video, I walk through the process of creating a DLP policy in monitor-only mode.

Microsoft Documentation Rescources.

Sensitive Info Dictionary:
https://docs.microsoft.com/en-us/microsoft-365/compliance/sensitive-information-type-entity-definitions?view=o365-worldwide

Overview of data loss prevention:
https://docs.microsoft.com/en-us/microsoft-365/compliance/data-loss-prevention-policies?view=o365-worldwide

Create, test, and tune a DLP policy:
https://docs.microsoft.com/en-us/microsoft-365/compliance/create-test-tune-dlp-policy?view=o365-worldwide View the reports for data loss prevention https://docs.microsoft.com/en-us/microsoft-365/compliance/view-the-dlp-reports?view=o365-worldwide

Conditional Access Policy Exporter

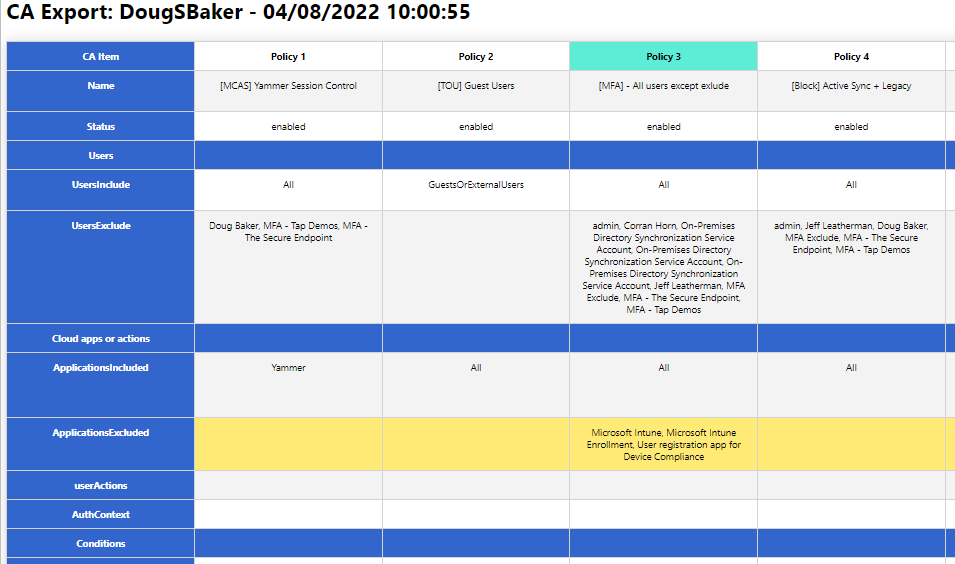
I perform best practice audits of customers’ Conditional Access (CA) policies on a regular basis. If you have ever done this, you will quickly notice that it can be a very intensive exercise due to Azure AD’s portal design. When customers only have a handful of CA policies it can be very easy and quick. However, when reviewing many policies it can quickly become impossible and overwhelming. When having to expand out every policy and sub config, it’s easy to forget all the options and what each policy did.

So to help with this, I wrote a Powershell script to help export these into an easier-to-audit and human-readable format. You might say, “But Doug, there are plenty of other options for exporting!” While this may be true, most of the options I found relied on GraphAPI calls that have proven difficult for clients to set up. Additionally, many of the outputs for these scripts did not help make my analysis easier. So the script below relies only on the Azure AD PowerShell module and hopefully makes it easier to read the policy configs.

Hope this helps you, and if it does send me a note and let me know. @Dougsbaker

CA-Export/Export-CaPolicy.v1.ps1 at main · dougsbaker/CA-Export (github.com)

Script Features

  • Only Requires AzureAD PowerShell Module
  • Exports to HTML Grid View
  • Ability to highlight Control / Condition

Features I am considering adding

  • Moveable Columns / Filters to hide
  • Multiple output formats
  • Export/Restore option

<#
	.SYNOPSIS
		Conditional Access Export Utility
	.DESCRIPTION
       Exports CA Policy to HTML Format for auditing/historical purposes. 

	.NOTES
		Douglas Baker
		@dougsbaker


        ############################################################################
        This sample script is not supported under any standard support program or service. 
        This sample script is provided AS IS without warranty of any kind. 
        This work is licensed under a Creative Commons Attribution 4.0 International License
        https://creativecommons.org/licenses/by-nc-sa/4.0/
        ############################################################################    
	
#>

#ExportLocation
$ExportLocation = "C:\scripts\"
$FileName = "CAPolicy.html"


$HTMLExport = $true

#Connect-AzureAD

try {
    Get-AzureADMSConditionalAccessPolicy -ErrorAction Stop > $null
    Write-host "Connected: AzureAD"
  }
  catch {
    Write-host "Connecting: AzureAD"  
   Try {
    Connect-AzureAD
   }
   Catch
   {
       Write-host "Error: Please Install AzureAD Module"
       Write-Host "Run: Install-module AzureAD"
   }
}
  
#Collect CA Policy
Write-host "Exporting: CA Policy"
$CAPolicy = Get-AzureADMSConditionalAccessPolicy
$TenantData = Get-AzureADTenantDetail
$TenantName = $TenantData.DisplayName


$date = Get-Date

$CAExport = [PSCustomObject]@()

$AdUsers = @()
$Apps = @()
#Extract Values
Write-host "Extracting: CA Policy Data"
foreach( $Policy in $CAPolicy)
{

    $IncludeUG = $null
    $IncludeUG = $Policy.Conditions.Users.IncludeUsers
    $IncludeUG +=$Policy.Conditions.Users.IncludeGroups
    $IncludeUG +=$Policy.Conditions.Users.IncludeRoles


    $ExcludeUG = $null
    $ExcludeUG = $Policy.Conditions.Users.ExcludeUsers
    $ExcludeUG +=$Policy.Conditions.Users.ExcludeGroups
    $ExcludeUG +=$Policy.Conditions.Users.ExcludeRoles
    
    
    $Apps += $Policy.Conditions.Applications.IncludeApplications
    $Apps += $Policy.Conditions.Applications.ExcludeApplications

    
    $AdUsers +=$ExcludeUG
    $AdUsers +=$IncludeUG
    
    $InclLocation = $Null
    $ExclLocation = $Null 
    $InclLocation = $Policy.Conditions.Locations.includelocations
    $ExclLocation = $Policy.Conditions.Locations.Excludelocations

    $InclPlat = $Null
    $ExclPlat = $Null 
    $InclPlat = $Policy.Conditions.Platforms.IncludePlatforms
    $ExclPlat = $Policy.Conditions.Platforms.ExcludePlatforms
    $InclDev = $null
    $ExclDev = $null
    $InclDev = $Policy.Conditions.Devices.IncludeDevices
    $ExclDev = $Policy.Conditions.Devices.ExcludeDevices
    $devFilters = $null
    $devFilters = $Policy.Conditions.Devices.DeviceFilter

    $CAExport += New-Object PSObject -Property @{ 
        Name = $Policy.DisplayName;
        Status = $Policy.State;
        Users = "";
        UsersInclude = ($IncludeUG -join ", `r`n");
        UsersExclude = ($ExcludeUG -join ", `r`n");
        'Cloud apps or actions' ="";
        ApplicationsIncluded = ($Policy.Conditions.Applications.IncludeApplications -join ", `r`n");
        ApplicationsExcluded = ($Policy.Conditions.Applications.ExcludeApplications -join ", `r`n");
        userActions = ($Policy.Conditions.Applications.IncludeUserActions -join ", `r`n");
        AuthContext = ($Policy.Conditions.Applications.IncludeAuthenticationContextClassReferences -join ", `r`n");
        Conditions = "";
        UserRisk = ($Policy.Conditions.UserRiskLevels -join ", `r`n");
        SignInRisk = ($Policy.Conditions.SignInRiskLevels -join ", `r`n");
       # Platforms = $Policy.Conditions.Platforms;
        PlatformsInclude =  ($InclPlat -join ", `r`n");
        PlatformsExclude =  ($ExclPlat -join ", `r`n");
       # Locations = $Policy.Conditions.Locations;
        LocationsIncluded = ($InclLocation -join ", `r`n");
        LocationsExcluded = ($ExclLocation -join ", `r`n");
        ClientApps = ($Policy.Conditions.ClientAppTypes -join ", `r`n");
       # Devices = $Policy.Conditions.Devices;
        DevicesIncluded = ($InclDev -join ", `r`n");
        DevicesExcluded = ($ExclDev -join ", `r`n");
        DeviceFilters =($devFilters -join ", `r`n");
        'Access Controls' = "";
     #   Grant = ($Policy.GrantControls.BuiltInControls -join ", `r`n");
        Block = if ($Policy.GrantControls.BuiltInControls -contains "Block") { "True"} else { ""}
        'Require MFA' = if ($Policy.GrantControls.BuiltInControls -contains "Mfa") { "True"} else { ""}
        'CompliantDevice' = if ($Policy.GrantControls.BuiltInControls -contains "CompliantDevice") { "True"} else { ""}
        'DomainJoinedDevice'  = if ($Policy.GrantControls.BuiltInControls -contains "DomainJoinedDevice") { "True"} else { ""}
        'CompliantApplication' = if ($Policy.GrantControls.BuiltInControls -contains "CompliantApplication") { "True"} else { ""}
        'ApprovedApplication'  = if ($Policy.GrantControls.BuiltInControls -contains "ApprovedApplication") { "True"} else { ""}
        'PasswordChange' = if ($Policy.GrantControls.BuiltInControls -contains "PasswordChange") { "True"} else { ""}
        TermsOfUse = if ($Policy.GrantControls.TermsOfUse -ne $null) {"True"} else {""};
        CustomControls =  if ($Policy.GrantControls.CustomAuthenticationFactors -ne $null) {"True"} else {""};
        GrantOperator = $Policy.GrantControls._Operator
       # Session = $Policy.SessionControls
        ApplicationEnforcedRestrictions = $Policy.SessionControls.ApplicationEnforcedRestrictions.IsEnabled
        CloudAppSecurity                = $Policy.SessionControls.CloudAppSecurity.IsEnabled
        PersistentBrowser               = $Policy.SessionControls.PersistentBrowser.Mode
        SignInFrequency                 = "$($Policy.SessionControls.SignInFrequency.Value) $($conditionalAccessPolicy.SessionControls.SignInFrequency.Type)"
    }
  
    
}

#Swith user/group Guid to display names
    Write-host "Converting: AzureAD Guid"
    #Filter out Objects
    $ADsearch = $AdUsers | Where-Object {$_ -ne 'All' -and $_ -ne 'GuestsOrExternalUsers' -and $_ -ne 'None'}
    $cajson =  $CAExport | ConvertTo-Json -Depth 4
    $AdNames =@{}
    Get-AzureADObjectByObjectId -ObjectIds $ADsearch |ForEach-Object{ 
        $obj = $_.ObjectId
        $disp = $_.DisplayName
        $AdNames.$obj=$disp
        $cajson = $cajson -replace "$obj", "$disp"
    }
    $CAExport = $cajson |ConvertFrom-Json
#Switch Apps Guid with Display names
     $allApps =  Get-AzureADServicePrincipal -All $true 
   $allApps | Where-Object{ $_.AppId -in $Apps} | ForEach-Object{
       $obj = $_.AppId
       $disp =$_.DisplayName
       $cajson = $cajson -replace "$obj", "$disp"
   }
#switch named location Guid for Display Names
    Get-AzureADMSNamedLocationPolicy| ForEach-Object{
        $obj = $_.Id
        $disp =$_.DisplayName
        $cajson = $cajson -replace "$obj", "$disp"
    }
#Switch Roles Guid to Names
    Get-AzureADDirectoryRole| ForEach-Object{
        $obj = $_.RoleTemplateId
        $disp =$_.DisplayName
        $cajson = $cajson -replace "$obj", "$disp"
    }
   $CAExport = $cajson |ConvertFrom-Json

#Export Setup
    Write-host "Pivoting: CA to Export Format"
    $pivot = @()
    $rowItem = New-Object PSObject
    $rowitem | Add-Member -type NoteProperty -Name 'CA Item' -Value "row1"
    $Pcount = 1
    foreach($CA in $CAExport)
    {
        $rowitem | Add-Member -type NoteProperty -Name "Policy $pcount" -Value "row1"
                #$ca.Name
                $pcount += 1
    }
    $pivot += $rowItem
  #  $pivot | Out-GridView
#Add Data to Report
$Rows = $CAExport | Get-Member | Where-Object {$_.MemberType -eq "NoteProperty"}
$Rows| ForEach-Object{
    $rowItem = New-Object PSObject
    $rowname = $_.Name
    $rowitem | Add-Member -type NoteProperty -Name 'CA Item' -Value $_.Name
    $Pcount = 1
    foreach($CA in $CAExport)
    {
        $ca | Get-Member | Where-Object {$_.MemberType -eq "NoteProperty"} | ForEach-Object {
            $a = $_.name
            $b = $ca.$a
            if ($a -eq $rowname) {
              $rowitem | Add-Member -type NoteProperty -Name "Policy $pcount" -Value $b  
            }
            
        }
      # $ca.UsersInclude
      $pcount += 1
    }
    $pivot += $rowItem
}
#Set Row Order
$sort = "Name","Status","Users","UsersInclude","UsersExclude","Cloud apps or actions", "ApplicationsIncluded","ApplicationsExcluded",`
        "userActions","AuthContext","Conditions", "UserRisk","SignInRisk","PlatformsInclude","PlatformsExclude","ClientApps", "LocationsIncluded",`
        "LocationsExcluded","Devices","DevicesIncluded","DevicesExcluded","DeviceFilters", "Access Controls", "Block", "Require MFA", "CompliantDevice",`
        "DomainJoinedDevice","CompliantApplication", "ApprovedApplication","PasswordChange", "TermsOfUse", "CustomControls", "GrantOperator", `
        "Session","ApplicationEnforcedRestrictions", "CloudAppSecurity", "PersistentBrowser", "SignInFrequency"


if ($HTMLExport) {
    Write-host "Saving to File: HTML"
$jquery = '  <script src="https://ajax.googleapis.com/ajax/libs/jquery/3.5.1/jquery.min.js"></script>
    <script>
    $(document).ready(function(){
        $("tr").click(function(){
        if(!$(this).hasClass("selected")){
            $(this).addClass("selected");
        } else {
            $(this).removeClass("selected");
        }

        });
        $("th").click(function(){
        if(!$(this).hasClass("colselected")){
            $(this).addClass("colselected");
        } else {
            $(this).removeClass("colselected");
        }

        });
    });
    </script>'
$html = "<html><head><base href='https://docs.microsoft.com/' target='_blank'>
                $jquery<style>
                .title{
                    display: block;
                    font-size: 2em;
                    margin-block-start: 0.67em;
                    margin-block-end: 0.67em;
                    margin-inline-start: 0px;
                    margin-inline-end: 0px;
                    font-weight: bold;
                    font-family: Segoe UI;
                    
                }
                table{
                    border-collapse: collapse;
                    margin: 25px 0;
                    font-size: 0.9em;
                    font-family: Segoe UI;
                    min-width: 400px;
                    box-shadow: 0 0 20px rgba(0, 0, 0, 0.15) ;
                    text-align: center;
               }
                thead tr {
                    background-color: #009879;
                    color: #ffffff;
                    text-align: left;
               }
                th, td {
                    min-width: 250px;
                    padding: 12px 15px;
                    border: 1px solid lightgray;
                    vertical-align: top;
               }
               
                td {
                    vertical-align: top;
               }
                tbody tr {
                    border-bottom: 1px solid #dddddd;
               }
                tbody tr:nth-of-type(even) {
                    background-color: #f3f3f3;
               }
               tbody tr:nth-of-type(4), tbody tr:nth-of-type(7), tbody tr:nth-of-type(12), tbody tr:nth-of-type(23){
                    background-color: #36c;
                    text-aling:left !important
                }
                tbody tr:last-of-type {
                    border-bottom: 2px solid #009879;
               }
               tr:hover{
                background-color: #ffea76!important;
            }
            
            .selected:not(th){
                background-color:#ffea76!important;
                
                }
                th{
                   background-color:white !important;
                }
                .colselected {
              
              background-color: rgb(93, 236, 213)!important;
              
              }
              table tr th:first-child,table tr td:first-child {
                    position: sticky;
                    inset-inline-start: 0; 
                    background-color: #36c!important;
                    Color: #fff;
                    font-weight: bolder;
                    text-align: center;
               }
                </style></head><body> <div class='Title'>CA Export: $Tenantname - $Date </div>"
                

    Write-host "Launching: Web Browser"           
    $Launch = $ExportLocation+$FileName
    $HTML += $pivot  | Where-Object {$_."CA Item" -ne 'row1' } | Sort-object { $sort.IndexOf($_."CA Item") }| convertto-html -Fragment
    $HTML | Out-File $Launch
        start-process $Launch
}

Label all files in an SPO site

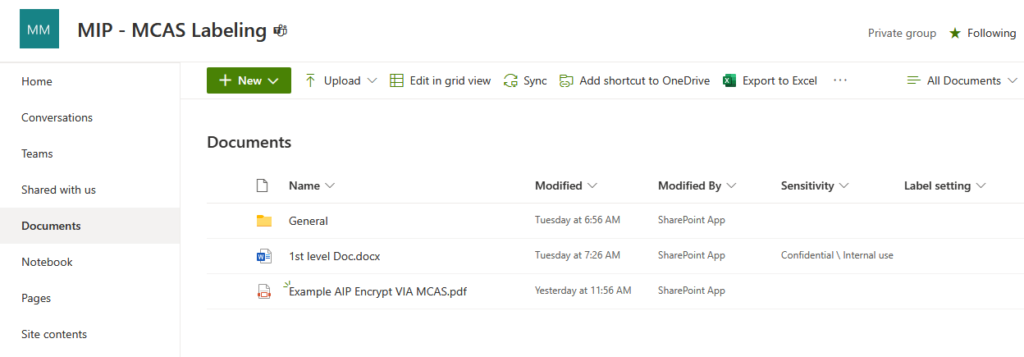
Oftentimes when deploying MIP Sensitive Labels, I run into use cases where customers want to auto label all files in an SPO site. This is usually for a site that will always contain proprietary data, such as a Project Site, or Departmental Site. When this comes up customers are typically looking at the Container Level Labeling trying to use that feature. Unfortunately, Container level Labels are all about controlling guests and sharing access, not about applying labels. So to achieve the control we have to build a custom workaround.

We have two options for applying a default label, each of which has their own strengths and weaknesses. The options are an MDCA Blind Label or MIP Auto-Labeling.

MDCA Blind Label

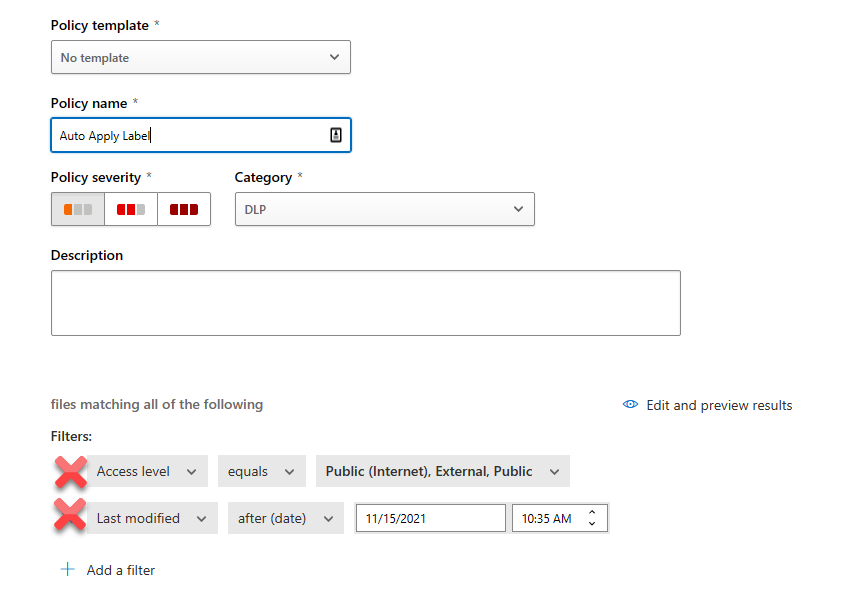
Option 1 to achieve this is a Defender for Cloud App (Formerly MCAS) File Policy. To make this feature work, you need to have gone through the prerequisite of connecting up MCAS to perform file scanning with Sensitive Labels. After that is done, we can create a File Policy. Next, name your policy and remove the default filters.

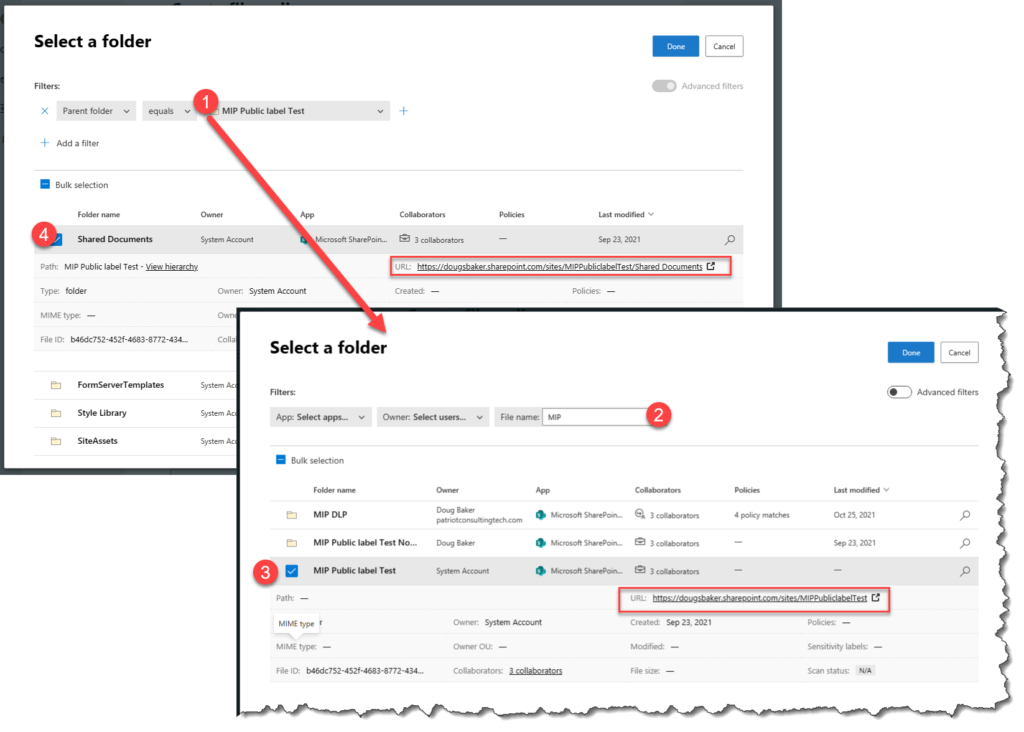
Next select “Appy to” and choose selected folders. In the add Folders area search for the SPO Root Site / Document Library Root Site. If it is not showing when you search by name you may need to use Advanced Filters. To do this, switch to the Advanced option and select and Parent Folder. In the new search that comes up, we can search for the SPO site we want. After that, we can then select Root Shared Documents Library or any other custom Library.

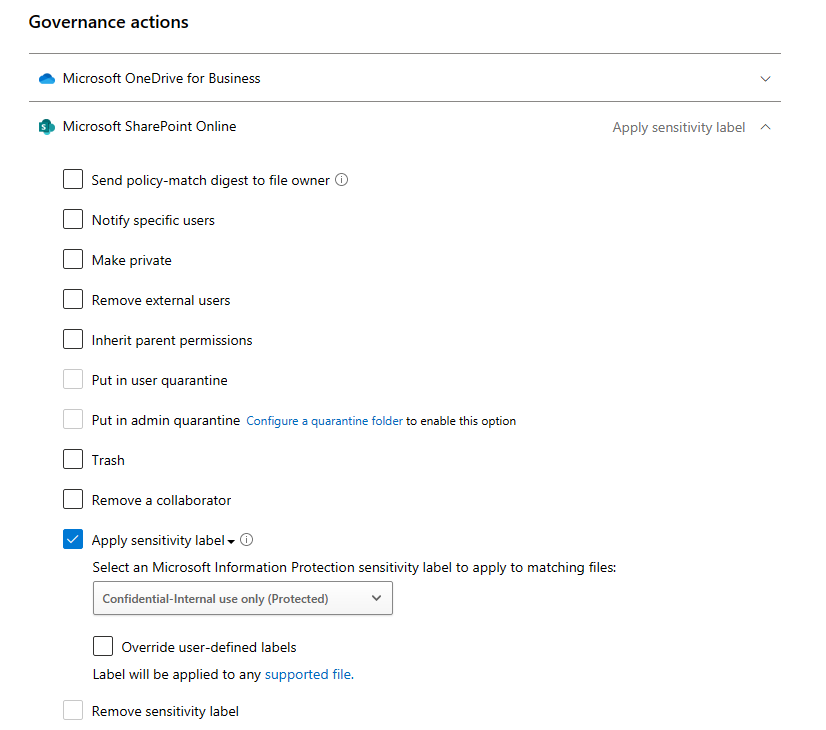
Finally, we need to select the governance action of Apply a Label. Here is one of the interesting options we get in via this portal, in MDCA we can choose to override the user’s choice. This is definitely a benefit to keep in mind as this is a unique option in MDCA.

When this is working, files in your site will eventually be updated to use your label. Run time takes roughly two hours in my site to make the change happen. Another item that is worth noting, is that if you are using MDCA to label you can apply labels to PDF’s. Also be aware that MDCA Updates the Last modified by to be the SPO Site. Additionally, if you have not enabled Co-Authoring with Sensitive Labels you will not be able to open the file via Web Browser.

MIP Auto-Labeling

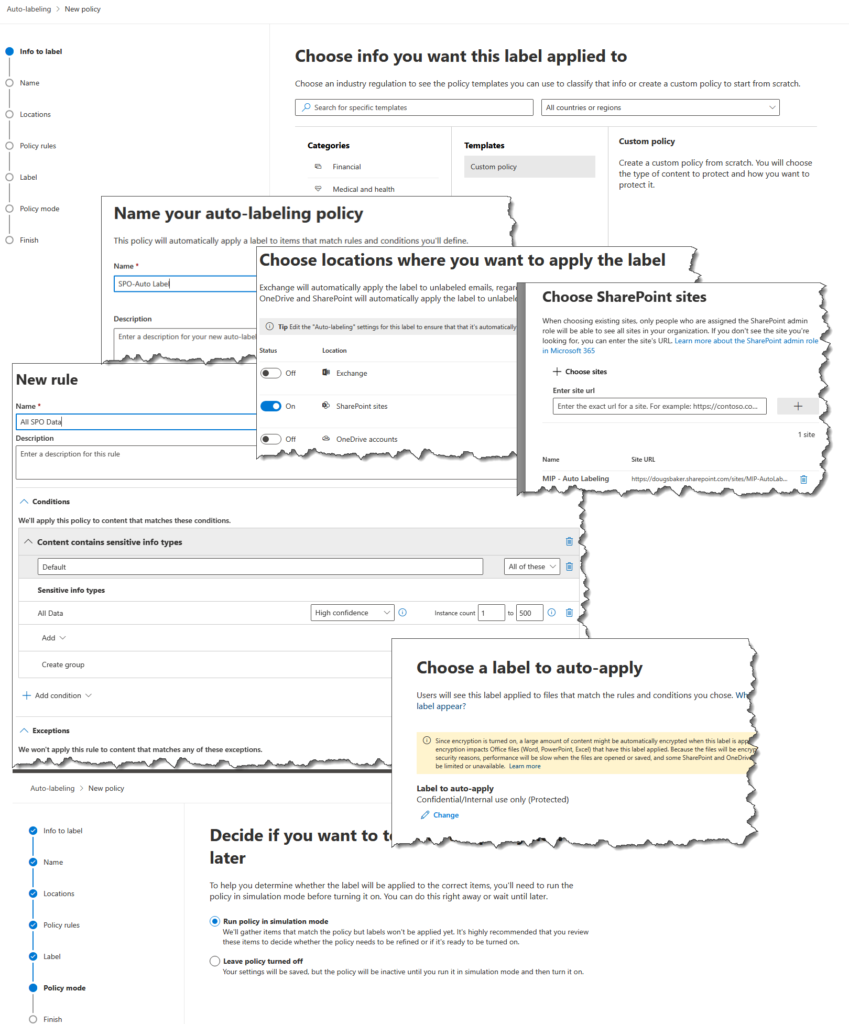
Option 2 is to use Auto Labeling in the Compliance Center. This is a great feature, and typically I recommend orgs use this with its built-in function of classifying based on the detected data in the file. However, for many customer scenarios, they don’t have a specific data type in their files. So to make it apply to a whole SharePoint library we need to game this technology.

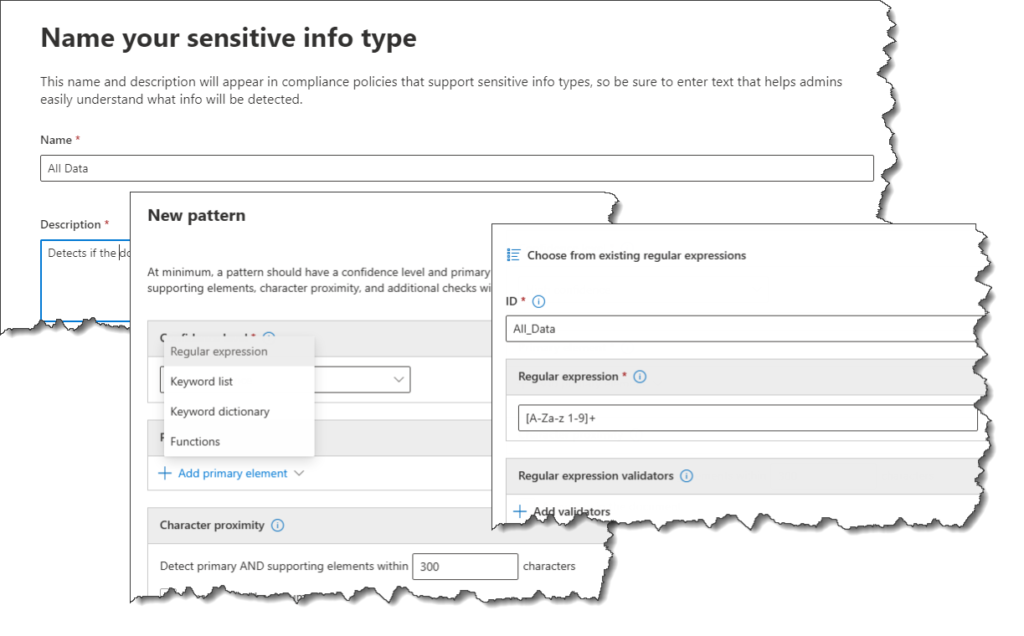
The First Step in this is to create a Custom Sensitive Info Type(SIT). In this case, we will essentially need to create a label that detects any data. For this, you will create a custom item I usually label as “All Data”. Under Compliance Select Sensitive Info. next Create a new data type and call it “All Data” In the next area we will add a regex [a-zA-Z 0-9]+ , Please note this can be adjusted to be more inclusive.

This is the Secret Sauce, this Regex essentially will hit on any file that has any content. This allows us to use the Auto-Labeling engine and target an SPO Site. We will need to create a new policy scoped to our SPO site, once scoped simply use our new “All data” and we will be all set.

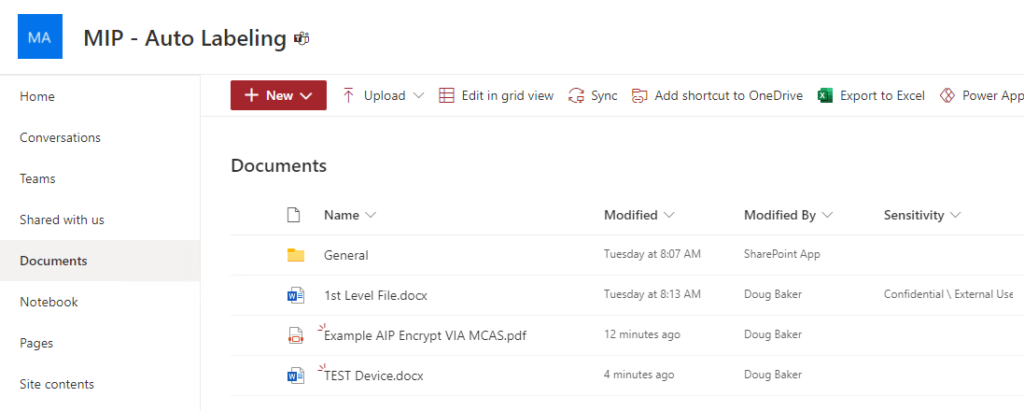
This engine runs very fast and once you have gone through your test phase you will be able to label files very quickly. This Auto-Labeling works roughly in 15 minutes in my tenant. The other benefit is that it keeps the last modified using the same user that last touched the file. The downside is PDF files are not supported for labeling but if Co-Authoring is not enabled you will be able to open the labeled file in the Web.

So there you go 2 options to label all the files in an SPO site. Hope this helps!

Microsoft Chrome Extensions

Do you still have users that love their Chrome? Haven’t convinced the org to switch to the new Edge Chromium? Want to make sure the user/security experience with Chrome matches the new features built into edge? Well if you do you are going to need to deploy some Microsoft Chrome Extensions. To help with that I made the below list of Chrome extensions you may want to consider deploying to your users. Let me know if I missed any you deploy?

The Best

Windows 10 Accounts

If you are using AzureAD for Authentication you are going to want this deployed to your Chrome users. With this addon deployed your users will auto be signed in to your Enterprise Apps. Additionally, if you are any device based auth from Win10 you will need this feature to pass the compliance status. https://chrome.google.com/webstore/detail/windows-10-accounts/ppnbnpeolgkicgegkbkbjmhlideopiji?hl=en

Microsoft Compliance Extension

Taking advantage of the great Endpoint DLP features offered with the MSFT compliance stack? Well if you are you should deploy the compliance extension. This gives Chrome the ability to detect what website your end-user is uploading your content to and block based on that. Without this Chrome defaults to blocking all sensitive data from transferring via the browser instead of being able to say upload to corporate SPO is allowed. https://chrome.google.com/webstore/detail/microsoft-compliance-exte/echcggldkblhodogklpincgchnpgcdco

Microsoft Defender Browser Protection / SmartScreen

If you use MDE you should deploy this extension to Chrome. This gives the end-user a warning about why the page they were trying to visit was blocked. This is essentially the equivalent of enabling SmartScreen in Edge. https://chrome.google.com/webstore/detail/microsoft-defender-browse/bkbeeeffjjeopflfhgeknacdieedcoml?hl=en

My Apps Secure Sign-in Extension

My Apps is an underrated extension, its primary focus is user experience. It lets you make the SSO apps readily available to your users. But also has some additional hidden benefits. The first is it makes password-based SSO available for your users, a huge win if you have a Corporate account you want available to your team. The Second is for admins it’s a great tool for debugging SAML Sign-on issues. https://chrome.google.com/webstore/detail/my-apps-secure-sign-in-ex/ggjhpefgjjfobnfoldnjipclpcfbgbhl?hl=en

Deploying Via Intune

Let me pause right here and say the above 4 are the go-to extensions that I think should be deployed. The rest of the list is interesting but are more pocket scenarios that I don’t see a lot of orgs using/wanting. If you decide to use the above apps your next question should be how do I deploy this to my end-users in mass? Well for me the easiest is deploying them via Intune, I used the directions from Lucas Cantor. Ingesting the ADMX for Chrome was very easy. The force deploying of the extensions, not so much. This is because parsing the extensions into the correct form can be difficult. So if you want to deploy the above 4 here is the OMA URI you can use to save yourself some time.

<enabled/> <data id="ExtensionInstallForcelistDesc" value="1&#xF000;ppnbnpeolgkicgegkbkbjmhlideopiji;https://clients2.google.com/service/update2/crx&#xF000;2&#xF000;bkbeeeffjjeopflfhgeknacdieedcoml;https://clients2.google.com/service/update2/crx&#xF000;3&#xF000;echcggldkblhodogklpincgchnpgcdco&#xF000;4&#xF000;ggjhpefgjjfobnfoldnjipclpcfbgbhl"/>

The Rest

One Note Web Clipper

Who doesnt love OneNote? I use this extension all the time to grab parts of articles for reference later. But I dont think all my users would want this. https://chrome.google.com/webstore/detail/onenote-web-clipper/gojbdfnpnhogfdgjbigejoaolejmgdhk

App Guard

App Guard is a very cool feature that you can use in Windows to Virtualize an app into an isolated container. The capability is available in Chrome with this extension. This isn’t in the above list because App Guard can be a very unwieldy deployment, that I just don’t see many orgs using. https://chrome.google.com/webstore/detail/application-guard-extensi/mfjnknhkkiafjajicegabkbimfhplplj?hl=en

Outlook

This is an interesting one, I have used it a little and it’s nice for quickly responding to emails, But mostly i use it for quickly checking what’s coming up in my calendar. https://chrome.google.com/webstore/detail/microsoft-outlook/ajanlknhcmbhbdafadmkobjnfkhdiegm

Office Extension

Similar to the My Apps Extension, this provides a nice way to launch Word and PowerPoint. From a design perspective, this is a superior experience, I wish I could collapse the MySign ins to this one but unfortunately, it doesn’t support all the same features.

https://chrome.google.com/webstore/detail/office/ndjpnladcallmjemlbaebfadecfhkepb?hl=en

Autofill – Non Corporate

This app allows end-users to save passwords in authenticator on their phone then replay them in chrome. This is an interesting app, that I am thinking may add more value in the future. Unfortunately, this is only available for non Corporate Microsoft accounts, so @outlook.com accounts. https://chrome.google.com/webstore/detail/microsoft-autofill/fiedbfgcleddlbcmgdigjgdfcggjcion?hl=en

Should I Integrate SharePoint sharing with Azure AD B2B

I was recently looking at new options available for controlling SharePoint and ran in into an interesting new feature I have never deployed. Specifically the Azure AD B2B integration with SharePoint and OneDrive. Azure AD B2B integration for SharePoint & OneDrive – SharePoint in Microsoft 365 | Microsoft Docs

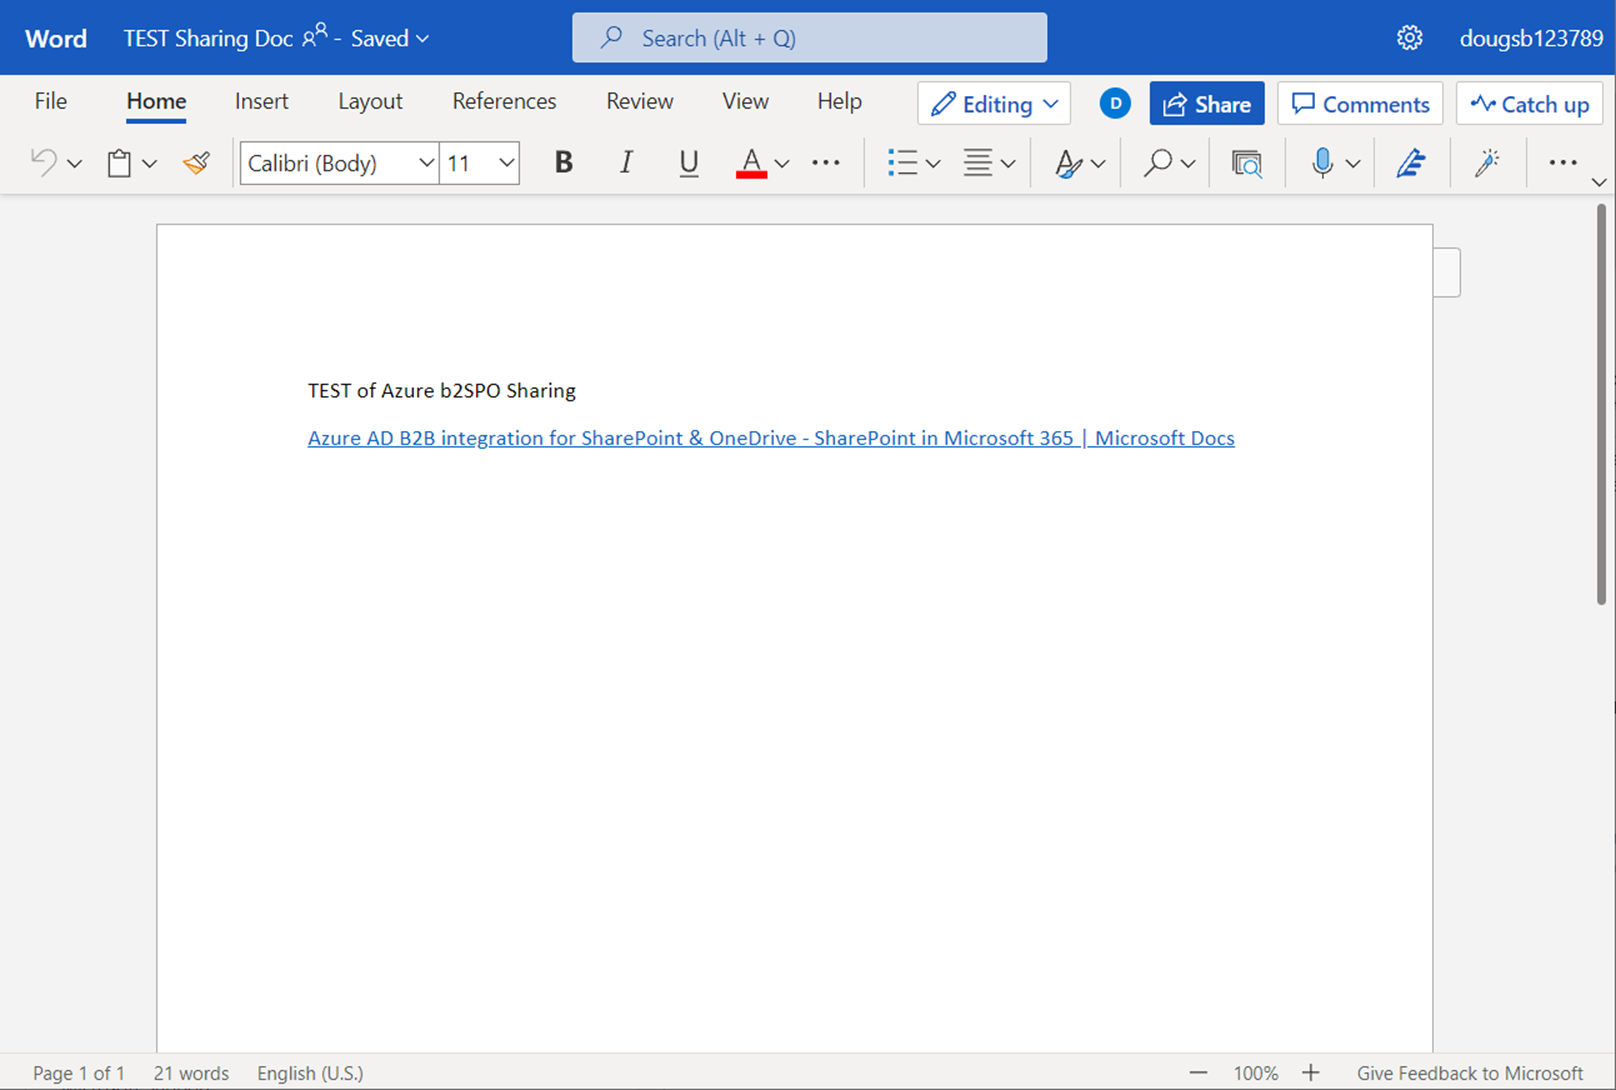
Seems like an easy enough feature to turn on. Just 2 lines of PowerShell and I am set. But the big question I struggled with when researching this was should I enable this for my tenant? When I do what will be the change in the user experience? Are there any issues/got ya’s when this is enabled? Below I attempt to explorer those questions so you don’t have to.

Long Story Short: You should probably turn the feature on. From a security perspective, you should definitely turn this on. For your guests, it will be a little more cumbersome, but I think the security controls win out. Finally, If you do turn it on I would definitely also integrate AzureAD to support External Identity providers. This will let your users sign in with their external Identity instead of relying on Passcode via email.

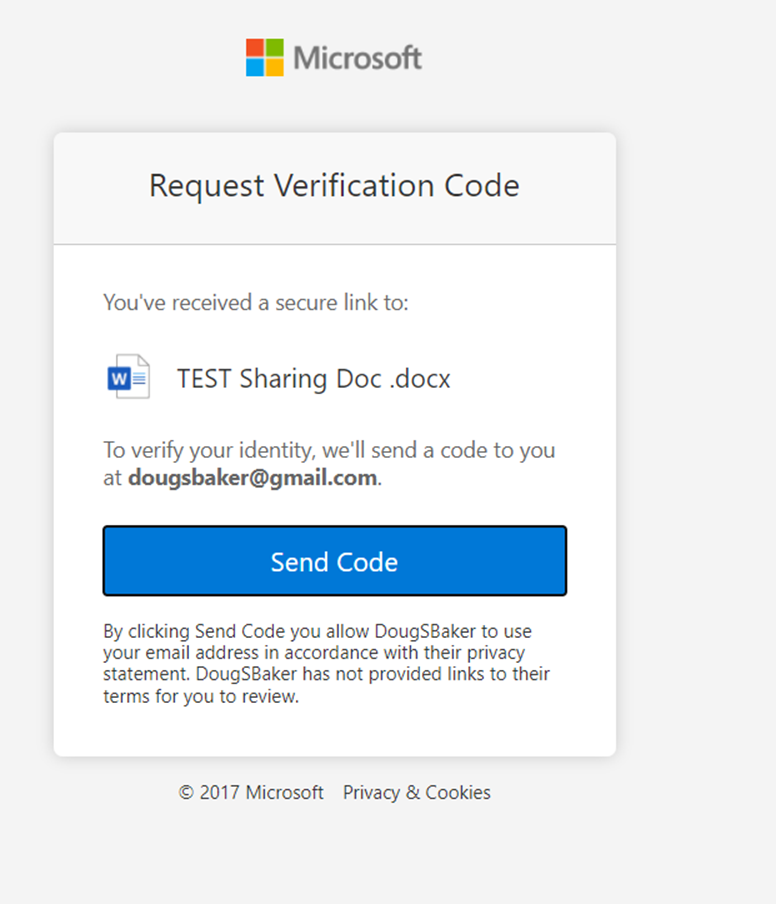
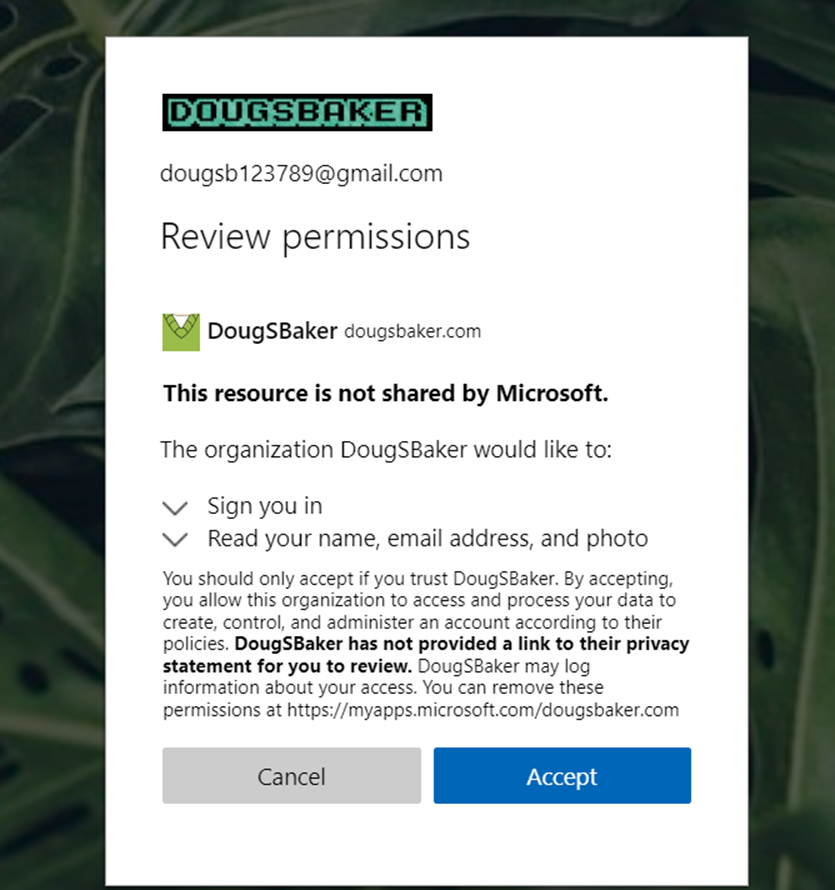
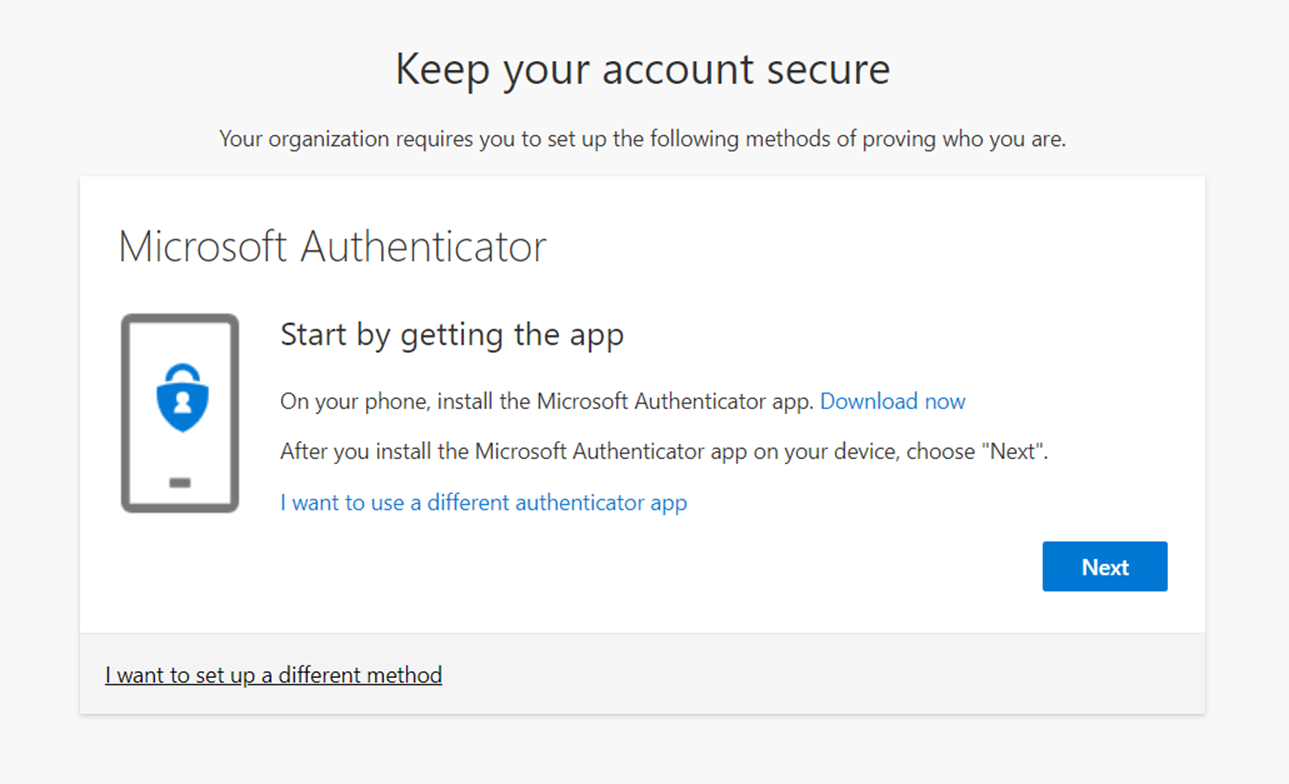
Security Benefit: If you enable the B2B integration, you will immediately get a better set of security controls over your guests. The biggest call out is that once you have enabled this, guests are subject to CA policy and all the controls we can do in CA. The largest of these control wins is the ability to MFA these guests. I was surprised to find out that accounts that did not have an AzureAD back(Gmail yahoo etc) defaulted to passcode over email and did not require MFA. The other win inside CA is you can require Terms of Service, this is especially helpful if you need a way for guests to provide consent for GDPR purposes.

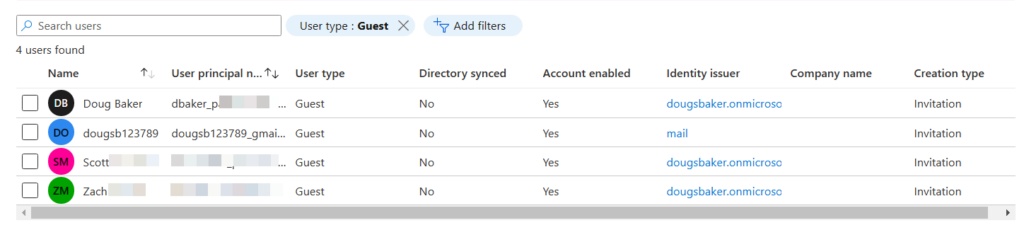
Gotchas: The biggest gotcha I can see so far with enabling this is now these guests will show up in Azure AD. Previously if just using the SPO Experience they did not. So if you enable this you will probably get an influx of guests that begin showing in Azure AD. So we need to make sure we have Access Reviews / a cleanup process running regularly to remove these users.

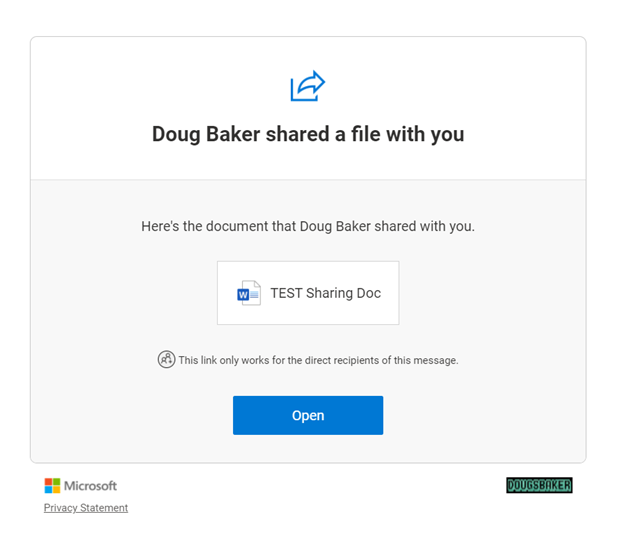
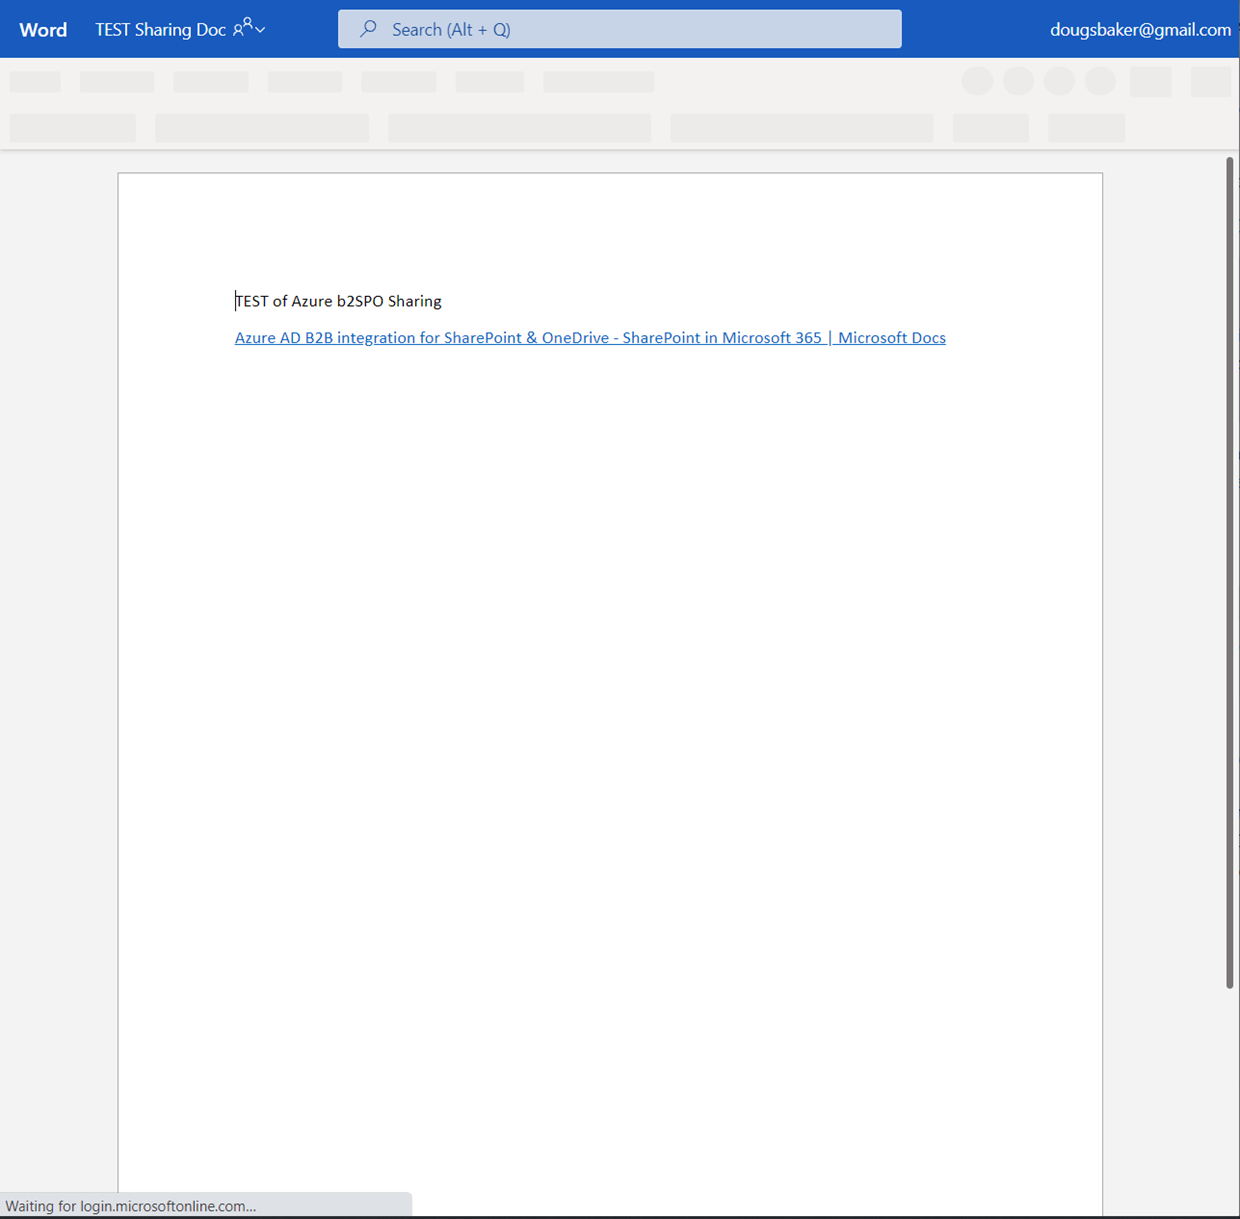
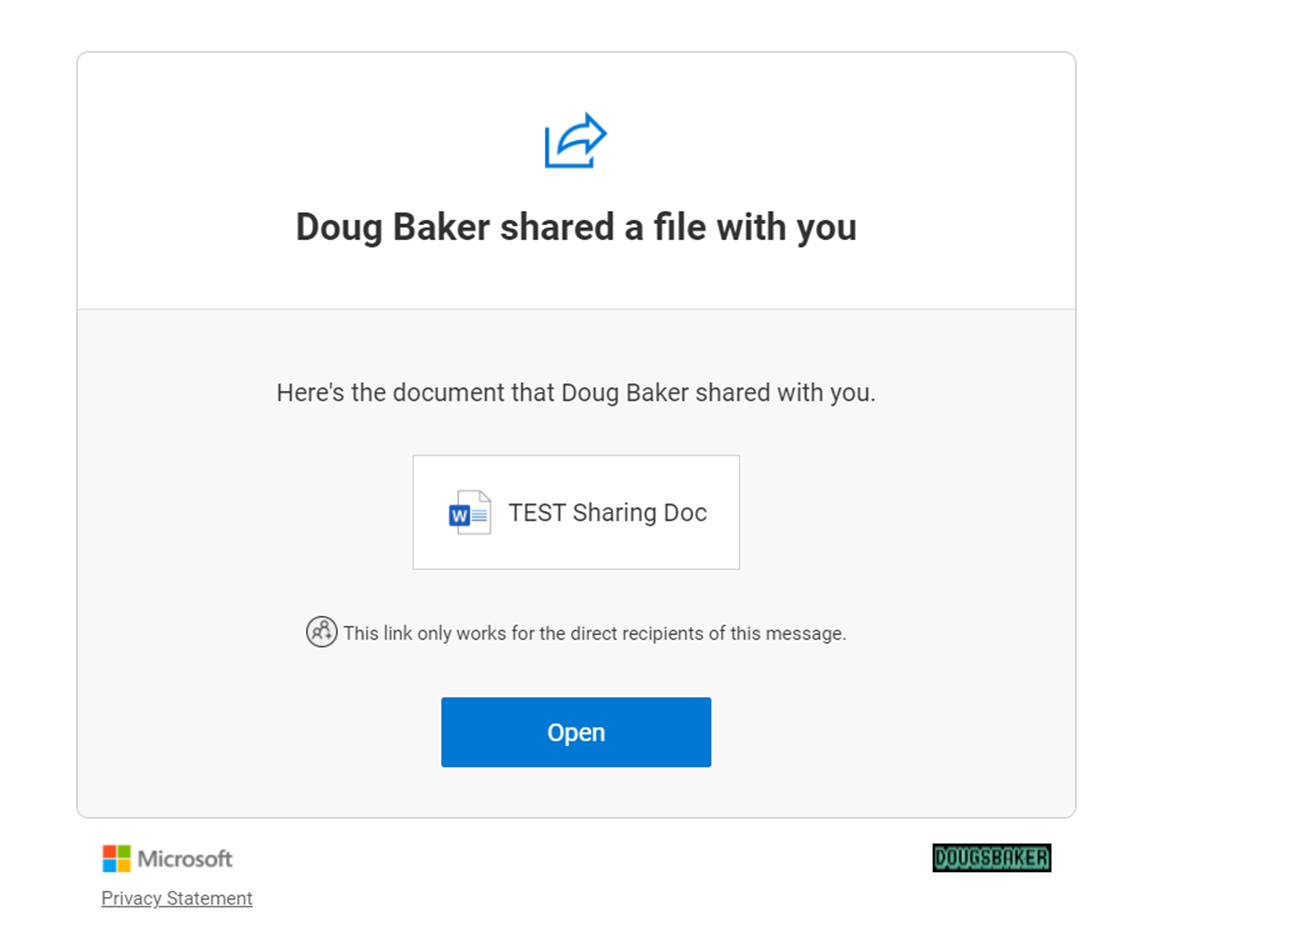
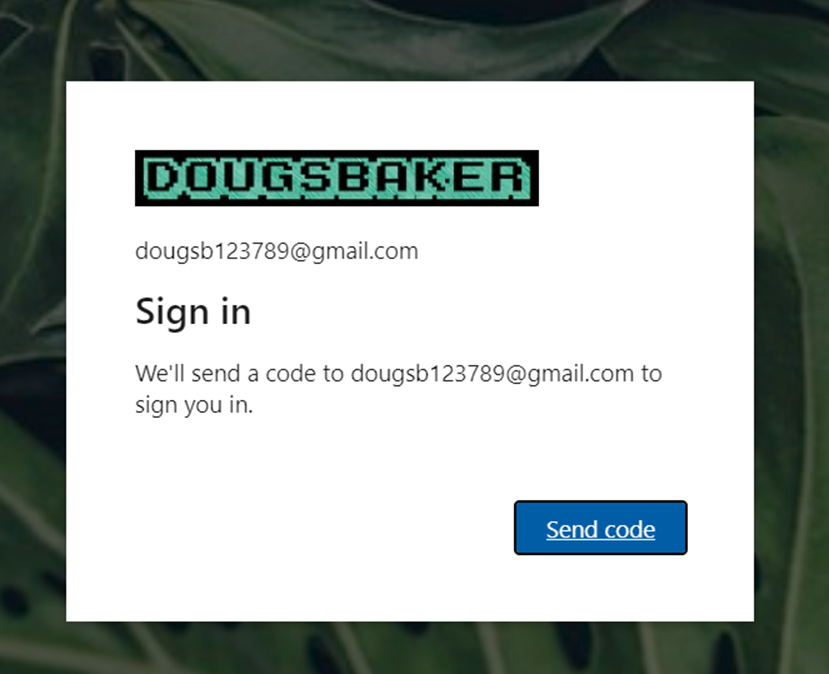
Guest User Experience: Below you will find a side-by-side comparison of the user experience. Overall for a guest, it is a slower experience, Especially if you have Conditional Access Policies in place requiring MFA. Again if you decide to move forward with the Azure AD B2B, consider also enabling External Identity providers.

Default ExperienceAzure AD B2B Enabled


Endpoint DLP PreReq Check

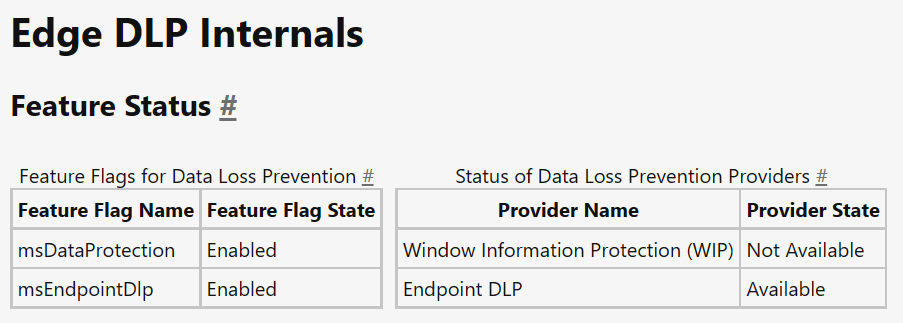
Looking to implement Microsoft’s Endpoint DLP? Concerned you haven’t met the prereqs for deployment? If you have that question then the first place you should check is the Edge URL’s. Microsoft has added a great little utility to help you identify the status of various DLP Utilities. Specifically in this case to check EndPoint DLP status you should visit edge://edge-dlp-internals/

Now, this is a great quick way to identify the status. However, it doesn’t really give us much info on what pre-req is making the product unavailable. I needed this detail recently so I wrote a quick PowerShell script to verify if my endpoint has met the pre-req’s and which one it failed on. If it helps you out Awesome! If it gives you an error let me know so I can help make the script better.

#===========================================================================
# Program: Check Defender status for Endpoint DLP
# Author: Douglas Baker
# Date: 2021-08-26
# Version : 1.0
# Note: https://docs.microsoft.com/en-us/microsoft-365/compliance/endpoint-dlp-getting-started?view=o365-worldwide#prepare-your-endpoints
#
#===========================================================================
#

write-host "Checking Prerequisits for Endpoint DLP"-ForegroundColor Green 
Write-Host "==========================================================" -ForegroundColor Green

$DefenderStatus = Get-MpPreference
$DefenderVersion = Get-MpComputerStatus

if ($DefenderStatus.DisableRealtimeMonitoring -eq $true) {
    Write-Host "Defender Real Time Monitoring is disabled, please enable before using Endpoint DLP" -ForegroundColor Red
} else {
    Write-Host "Defender Real Time Monitoring is enabled" -ForegroundColor Green
}
if ($DefenderStatus.DisableBehaviorMonitoring -eq $true) {
    Write-Host "Defender Behavior Monitoring is disabled, please enable before using Endpoint DLP" -ForegroundColor Red
} Else {
    Write-Host "Defender Behavior Monitoring is enabled" -ForegroundColor Green
}
if ([version]::Parse($DefenderVersion.AMServiceVersion) -le [version]::Parse('4.18.2009.7') ) {
    Write-Host "Defender AV needs to be updated, please updated AM client before using Endpoint DLP" -ForegroundColor Red
} else {
    Write-Host "Defender AV is on version that is supported by Endpoint DLP" -ForegroundColor Green
}
if( [Environment]::OSVersion.Version -lt (new-object 'Version' 10,0,17686) ) {
    write-host "Windows needs to be updated at least version 10x64 Build 1809" -ForegroundColor Red
} else {
    Write-Host "Windows is updated to a supported version" -ForegroundColor Green
}

$dsregcmd = dsregcmd /status
$aad = New-Object -TypeName PSObject
$dsregcmd | Select-String -Pattern " *[A-z]+ : [A-z]+ *" | ForEach-Object {
          Add-Member -InputObject $aad -MemberType NoteProperty -Name (([String]$_).Trim() -split " : ")[0] -Value (([String]$_).Trim() -split " : ")[1] -ErrorAction SilentlyContinue
     }

if ($aad.azureadjoined -eq "no") {
    Write-Host "Windows must be AzureAdJoined for Endpoint DLp to work. Please Join the device to Azure AD" -ForegroundColor Red
} else {
    Write-Host "Windows is AzureAdJoined" -ForegroundColor green
}