Defender for Identity Audit Deleted Objects

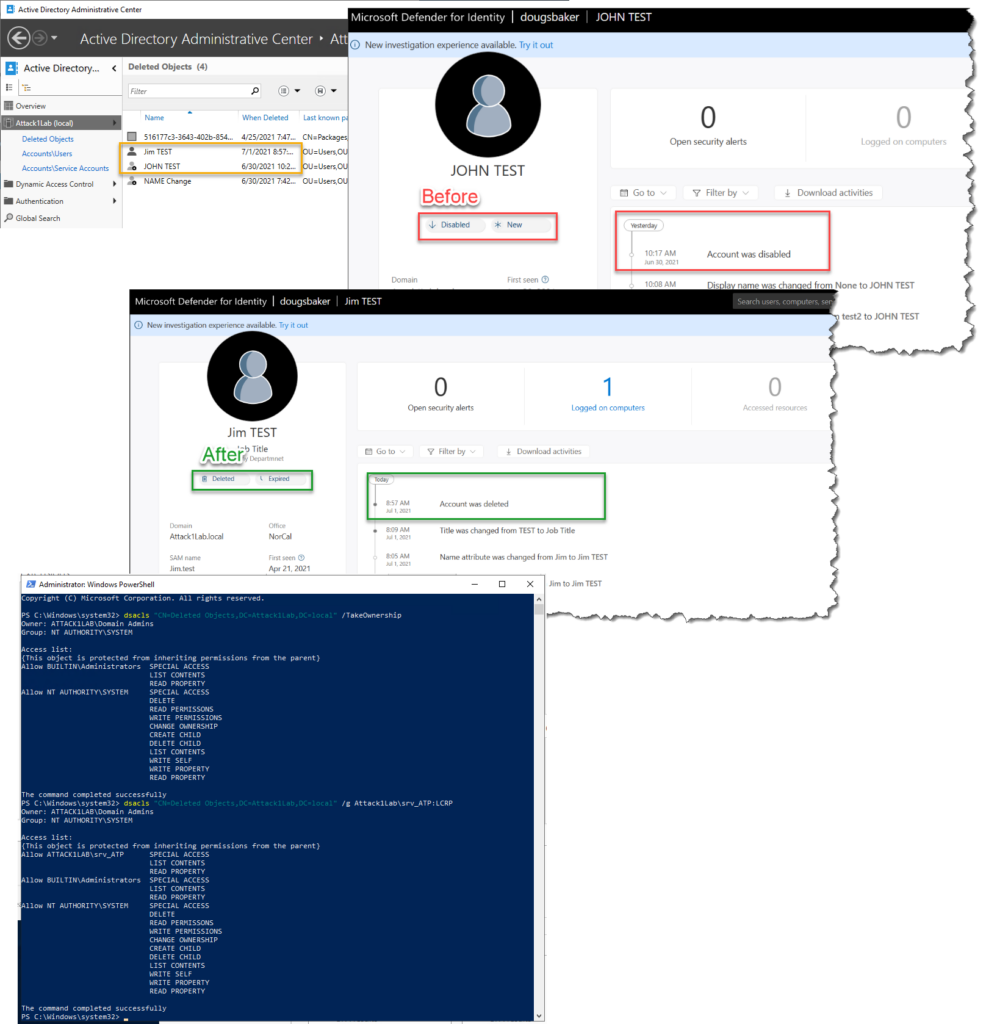
So recently I noticed in my new Server 2019 DFI lab I was not getting auditing when an object was deleted. This was curious to me as I have always in the past gotten this type of info from the product. Turns out there is one line I missed on pre-reqs that I have never run into it being an issue before.

Deleted Objects container Recommendation: User should have read-only permissions on the Deleted Objects container. Read-only permissions on this container allow Defender for Identity to detect user deletions from your Active Directory.

Microsoft Defender for Identity prerequisites | Microsoft Docs

I have always just blazed past this note because I go to the root level of the domain granted Read Acces to my service account. This works great everywhere except apparently the Deleted Objects Folder. Turns out that when you enable the Deleted Objects folder it does not by default inherit permissions. Well in this lab it the issue presented itself because I had actually gone in and enabled the AD Recycle Bin, but hadn’t done any customizations. Domain Admins had rights but no other accounts, including my Service Account. So Defender for Identity couldn’t see when an object was moved to that temp container.

You can identify if you have this issue by deleting a test AD account and wait for your portal to update. or by running the below command

#List permissions
dsacls "CN=Deleted Objects,DC=Attack1Lab,DC=local"

Well if you find you have this issue don’t be too alarmed fixing it is pretty easy.

#Give yourself Permissions to modify the container
dsacls "CN=Deleted Objects,DC=Attack1Lab,DC=local" /takeownership
#Give your DFI service account access to read items in the container
dsacls "CN=Deleted Objects,DC=Attack1Lab,DC=local" /g Attack1Lab\srv_ATP:LCRP
#if using GMSA make sure you single quote the command or powershell will convert it to a variable. 
dsacls "CN=Deleted Objects,DC=Attack1Lab,DC=local" /g 'Attack1Lab\gmsa-DFI$:LCRP'

Hope This helps!

Audit All Mailbox Activity

Note: Updated 11/12/2021 to include SearchQueryInitiated

Ever wanted to make sure you are auditing all available activities in Exchange Online? Me too! So I wrote a PowerShell to turn on logging for every possible item EXO can audit. Adjust to your liking and license level!

So why would you want this? Isn’t logging enabled by default in EXO? Well, sort of… According to MSFT documentation, not all available activities are enabled by default. Some of these may be inconsequential, like updating record tags, but some of these like moving an item to a folder or accessing a folder may paint an important picture of activities that happened in a mailbox. The other more important reason you would want to do this is I have noticed EXO does not always enable logging. A few times I have randomly found users with Audit logging disabled, or more commonly during license changes, E3 to E5 upgrades, not all of the Advanced Auditing turns on. Also just as a note to audit everything you will need some version of an E5, see KB articles above.

#Enable global audit logging
Get-Mailbox -ResultSize Unlimited -Filter `
 {RecipientTypeDetails -eq "UserMailbox" -or RecipientTypeDetails -eq "SharedMailbox" -or RecipientTypeDetails -eq "RoomMailbox" -or RecipientTypeDetails -eq "DiscoveryMailbox"} `
 | Select PrimarySmtpAddress `
 | ForEach {$_.PrimarySmtpAddress
    Set-Mailbox -Identity $_.PrimarySmtpAddress -AuditEnabled $true -AuditLogAgeLimit 180 `
    -AuditAdmin   @{add="ApplyRecord","Copy","Create", "FolderBind" , "HardDelete", "MailItemsAccessed",  "Move", "MoveToDeletedItems","RecordDelete", "Send", "SendAs", "SendOnBehalf", "SoftDelete", "Update", "UpdateCalendarDelegation", "UpdateComplianceTag", "UpdateFolderPermissions", "UpdateInboxRules"  } `
    -AuditDelegate @{add="ApplyRecord", "Create", "FolderBind" , "HardDelete", "MailItemsAccessed" , "Move", "MoveToDeletedItems","RecordDelete",  "SendAs", "SendOnBehalf", "SoftDelete", "Update",  "UpdateComplianceTag", "UpdateFolderPermissions", "UpdateInboxRules"  } `
    -AuditOwner  @{add="ApplyRecord", "Create", "HardDelete", "MailItemsAccessed", "MailboxLogin", "Move", "MoveToDeletedItems","RecordDelete", "Send",  "SoftDelete", "Update", "UpdateCalendarDelegation", "UpdateComplianceTag", "UpdateFolderPermissions", "UpdateInboxRules", "SearchQueryInitiated"  }
   }# #

#Double-Check It!
$FormatEnumerationLimit=-1
Get-Mailbox -ResultSize Unlimited | select Name, email, AuditEnabled, AuditLogAgeLimit, Auditowner, auditdelegate, AuditAdmin  | Out-Gridview

Find EOP – MDO Misconfig with KQL

One of the biggest/most common misconfigurations I have seen with EOP/MDO is an overuse of IP or domain allow lists. MSFT has updated its guidelines to no longer recommend customers use those features. However, the hard thing is determining how many emails are coming into your environment without scanning due to those settings. I needed to document this the other day so I went and used the new Microsoft Security Advanced Hunting to get some stats on how big this issue was for my environment. Below are some KQL examples that might help you determine if this is an issue for your environment.

//MDO Org overrides
EmailEvents
| where EmailDirection  == "Inbound"
| where Connectors == ""
| summarize count() by EmailDirection, OrgLevelAction, OrgLevelPolicy

// Domains being allowed
EmailEvents
| where EmailDirection  == "Inbound"
| where Connectors == ""
| where OrgLevelAction == "Allow"
|summarize count() by SenderFromDomain

//User Level overrides
EmailEvents
| where EmailDirection  == "Inbound"
| where Connectors == ""
| summarize count() by EmailDirection, UserLevelAction, UserLevelPolicy

The above KQL is assuming emails that come from a connector should not be scanned. If you need that in this report make sure you just add it in!

Deploy MDATP Tags with Intune

Do you feel its a little funny that Microsoft doesn’t have a built-in way to deploy MDATP tags Via Intune? Well, so do I! To get around this weakness I went and wrote a little Powershell script to help take care of it. Deploy it via intune script policy and you should be set/manage any regional tags you want in MDATP via intune.

Shout out to the Microsoft Scripting Guy Ed Wilson for the base code to update the values. https://devblogs.microsoft.com/scripting/update-or-add-registry-key-value-with-powershell/

$registryPath = "HKLM:SOFTWARE\Policies\Microsoft\Windows Advanced Threat Protection\DeviceTagging\"

$Name = "Group"
$value = "PowerShellTag"

IF(!(Test-Path $registryPath))

  {
    New-Item -Path $registryPath -Force | Out-Null
    New-ItemProperty -Path $registryPath -Name $name -Value $value -PropertyType String -Force | Out-Null}

 ELSE {
    New-ItemProperty -Path $registryPath -Name $name -Value $value -PropertyType string -Force | Out-Null}
Intune Settings

Let me know if there is an easier way to do this.

MDATP Portal

Export Azure backups in VHD format

Have you ever run into an issue where you need to export a backup of an Azure vm? No? Just me? Okay, well It can be a pain because there is no native way to just get the VHD of the backup file. If you want to restore a backup point, it’s no problem. If you want to clone a machine, no problem! Export a backup that you have already taken, well now that is a lot of work!

The trouble is due to how managed disks work in Azure. Since I am running machines with managed disks, when you restore the backup it retains that format and is only in a format that can be used by Azure. You may have noticed that if you ever pull up Azure file explorer you can’t see any of your vm’s disks, so to get around that you have to convert your managed disks to VHD and copy them to a new storage account.

Here is the hard thing, there is no way in the GUI to do this you have to use power shell if you want to get this to work. Lucky for you here is how you can do it without coming up with another option.

1st go into your Azure backups and restore a backup point. Here you want to create a new restore disk. Make sure to select the

2nd create a new blob you want to copy the VHD exports to. Once created you will need to determine the storage account Name, Container Name, and keys for the blob you plan on using.

You can find most of this info in your storage account.

3rd connect to your Azure environment via power shell.

At this point we need to identify the name or names of the restored disks we want to convert or export.

Use the following script to identify there name based on their creation date.

Connect-AzureRmAccount
get-azurermdisk | sort-object -property timecreated | ft name, TimeCreated

Finally we just need to put it all together and we can export these to our blob and then use storage explorer to download the files.

$disks = 'Disk1','Disk2'
$resourcegroup = 'enter the managed disk resource group name'

foreach ( $diskname in $disks){
$diskname
Get-AzureRmDisk -DiskName $diskname -ResourceGroupName $resourcegroup
$SAS = Grant-AzureRmDiskAccess -DiskName $diskname -ResourceGroupName $resourcegroup -DurationInSecond 58600 -Access Read
# Get the destination details
$storageAccountName = "##theNameof yourBlob##"
$storageContainerName = "##vhd##"
$destinationVHDFileName = $diskname
$storageAccountKey = "##yourkey##"
$destinationContext = New-AzureStorageContext –StorageAccountName $storageAccountName -StorageAccountKey $storageAccountKey
$sas.AccessSAS
# copy the vhd
Start-AzureStorageBlobCopy -AbsoluteUri $sas.AccessSAS -DestContainer $storageContainerName -DestContext $destinationContext -DestBlob $destinationVHDFileName
}

If you are in a time crunch you can monitor the status of the export by using the following code.

foreach ( $diskname in $disks){
$status = Get-AzureStorageBlobCopyState -Blob $destinationVHDFileName -Container $storageContainerName -Context $destinationContext
$percentage = $status.BytesCopied/$status.TotalBytes*100
$percentage = "{0:N2}" -f $percentage
Write-Host -ForegroundColor Yellow "$percentage completed!"
}

Cloud app security – admin changes alert

I really love Microsoft’s Cloud App Security tool. It is quickly becoming the one place I go to check all logs, as well as remediate any security issues with my Office 365 environments.

The hardest thing about this tool is out of the box it can be a little chatty- alerting you to too many things or not alerting you about the right things. One of the things I feel it doesn’t alert well on out of the box is admin elevations. This may be because Microsoft has other places they have standard alerts for this type of thing. But I really like having a single plane of glass for my security events and this is a big one I want to have visibility into. Below is a policy so you can add to be notified when admins are changed.

First, create a name and set the severity to high.

Next, we need to filter what activities, the ones I have found I want to be alerted on, is the following. These member roles are not well described from the drop down, but these are all the admin rights in Office 365. Security admin, billing admin, global admin, etc.. will trigger any time there is a change.

Once you have this set you can just save your policy and you are good to go. You should start seeing the alerts in the CAS portal anytime there is admin permission update.

And here is an extra tip- I like to be notified in real time, so with CAS you can elect to get text messages notifications about these alerts as well as in an email. This way you make sure you are aware and can take action as soon as a change happens.

Office 365 Updating email distro with contacts

Ever run into a user request where they need you to update a distribution list with users that are not on your system? No Problem you say, only to discover its a excel spread sheet with 100 or more people. AGH….

PowerShell to the rescue.

Here is a script I used to create and add mail contacts to a 365 Distribution list in mass. This code assumes 2 things. 1st you have csv with with columns named ‘CONTACT NAME’ and ‘E-MAIL’, 2nd you have already connected to Exchange online.


$csvpath = “C:\PATH TO\Users.csv”
 $list = “EMaillist”
 $people = Import-Csv $csvpath
 foreach($person in $people){
 $check = $null
 $check = Get-MailContact $person.’E-MAIL’
 if($check -eq $null)
 {
 New-MailContact -name $person.’CONTACT NAME’ -ExternalEmailAddress $person.’E-MAIL’
 Add-DistributionGroupMember -Identity $list -Member $person.’E-MAIL’
 } Else{
 Add-DistributionGroupMember -Identity $list -Member $person.’E-MAIL’
 }
 }

Thats it, simple easy. In this script we are checking if the there is already a contact, if no we go and create it and add it to our group. If the contact is already in Exchange we simply just add it.