Label all files in an SPO site

Oftentimes when deploying MIP Sensitive Labels, I run into use cases where customers want to auto label all files in an SPO site. This is usually for a site that will always contain proprietary data, such as a Project Site, or Departmental Site. When this comes up customers are typically looking at the Container Level Labeling trying to use that feature. Unfortunately, Container level Labels are all about controlling guests and sharing access, not about applying labels. So to achieve the control we have to build a custom workaround.

We have two options for applying a default label, each of which has their own strengths and weaknesses. The options are an MDCA Blind Label or MIP Auto-Labeling.

MDCA Blind Label

Option 1 to achieve this is a Defender for Cloud App (Formerly MCAS) File Policy. To make this feature work, you need to have gone through the prerequisite of connecting up MCAS to perform file scanning with Sensitive Labels. After that is done, we can create a File Policy. Next, name your policy and remove the default filters.

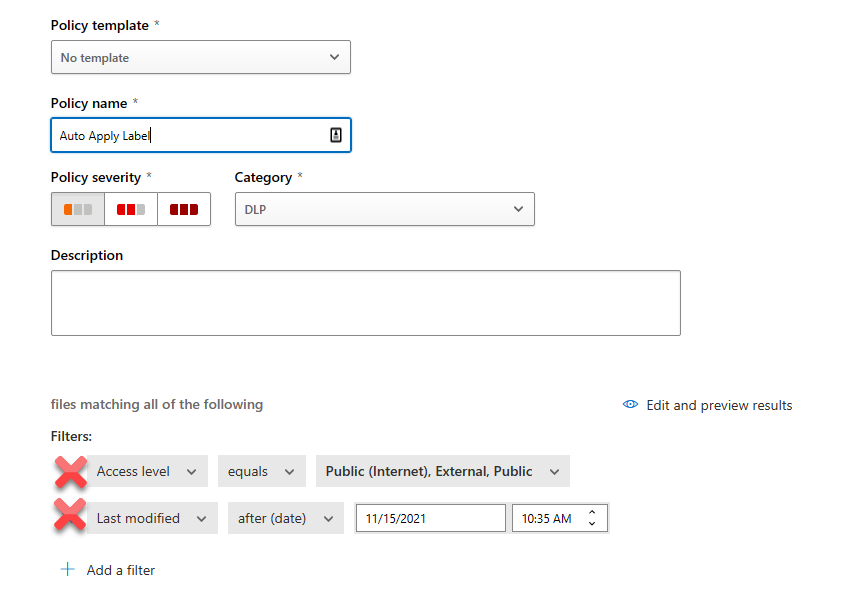
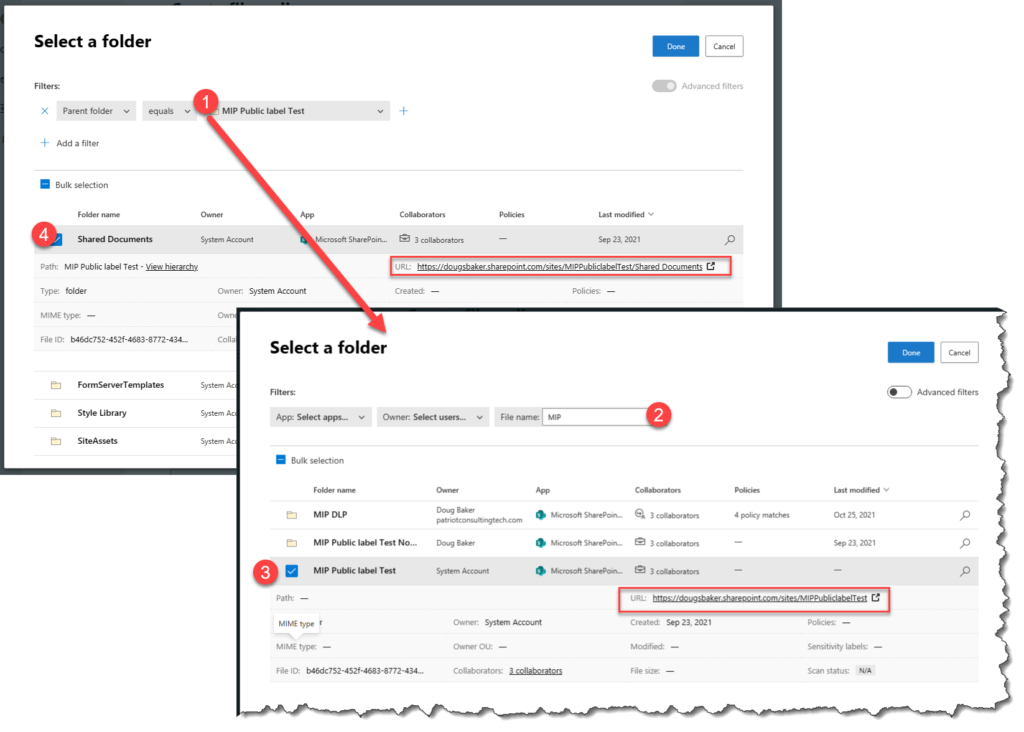
Next select “Appy to” and choose selected folders. In the add Folders area search for the SPO Root Site / Document Library Root Site. If it is not showing when you search by name you may need to use Advanced Filters. To do this, switch to the Advanced option and select and Parent Folder. In the new search that comes up, we can search for the SPO site we want. After that, we can then select Root Shared Documents Library or any other custom Library.

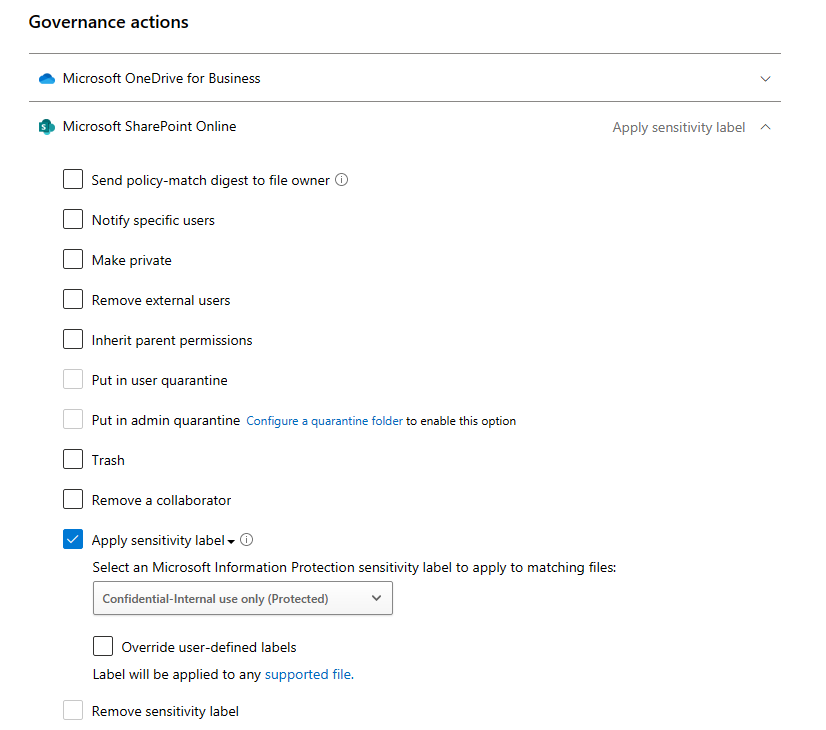
Finally, we need to select the governance action of Apply a Label. Here is one of the interesting options we get in via this portal, in MDCA we can choose to override the user’s choice. This is definitely a benefit to keep in mind as this is a unique option in MDCA.

When this is working, files in your site will eventually be updated to use your label. Run time takes roughly two hours in my site to make the change happen. Another item that is worth noting, is that if you are using MDCA to label you can apply labels to PDF’s. Also be aware that MDCA Updates the Last modified by to be the SPO Site. Additionally, if you have not enabled Co-Authoring with Sensitive Labels you will not be able to open the file via Web Browser.

MIP Auto-Labeling

Option 2 is to use Auto Labeling in the Compliance Center. This is a great feature, and typically I recommend orgs use this with its built-in function of classifying based on the detected data in the file. However, for many customer scenarios, they don’t have a specific data type in their files. So to make it apply to a whole SharePoint library we need to game this technology.

The First Step in this is to create a Custom Sensitive Info Type(SIT). In this case, we will essentially need to create a label that detects any data. For this, you will create a custom item I usually label as “All Data”. Under Compliance Select Sensitive Info. next Create a new data type and call it “All Data” In the next area we will add a regex [a-zA-Z 0-9]+ , Please note this can be adjusted to be more inclusive.

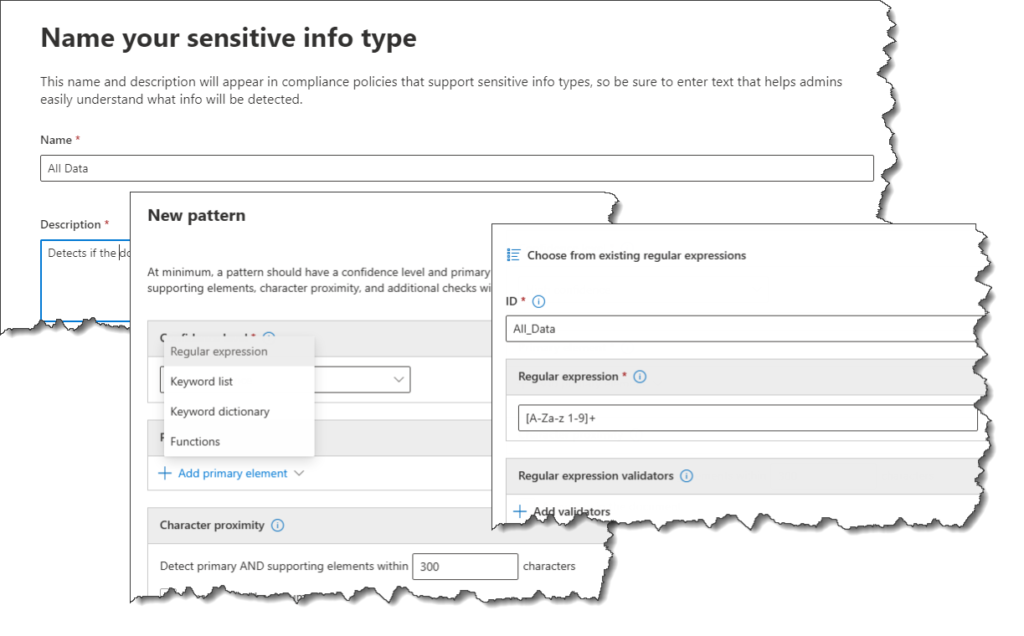
This is the Secret Sauce, this Regex essentially will hit on any file that has any content. This allows us to use the Auto-Labeling engine and target an SPO Site. We will need to create a new policy scoped to our SPO site, once scoped simply use our new “All data” and we will be all set.

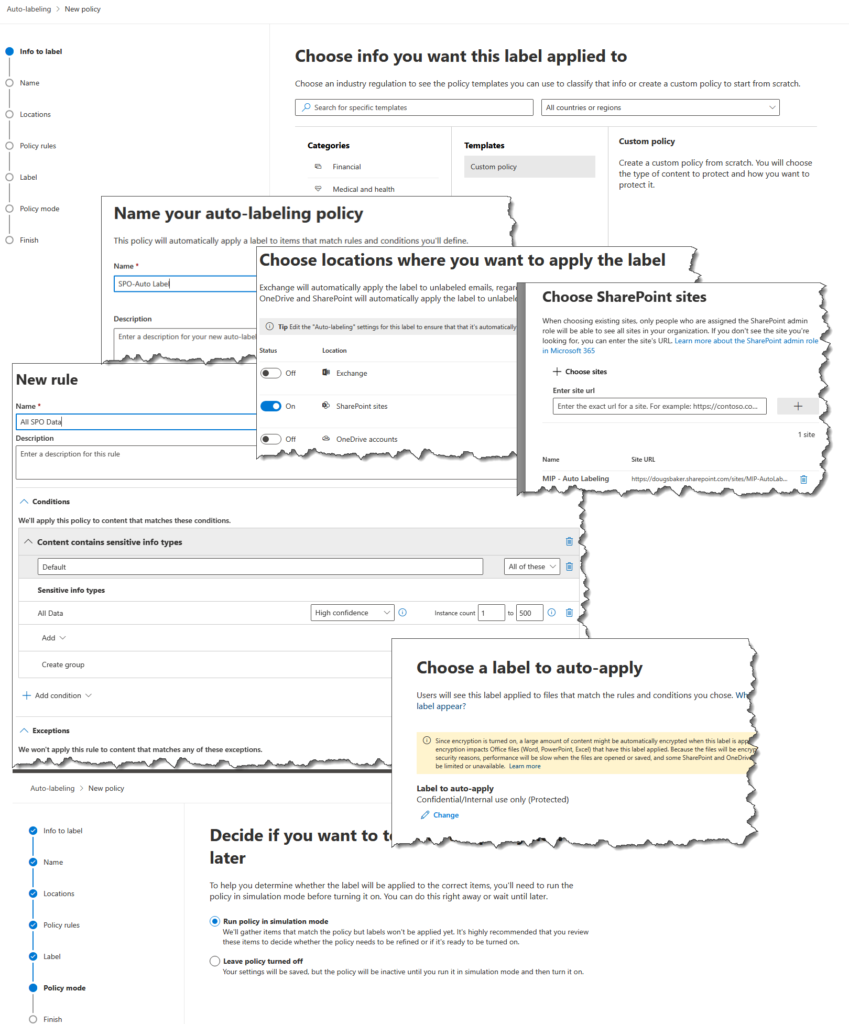
This engine runs very fast and once you have gone through your test phase you will be able to label files very quickly. This Auto-Labeling works roughly in 15 minutes in my tenant. The other benefit is that it keeps the last modified using the same user that last touched the file. The downside is PDF files are not supported for labeling but if Co-Authoring is not enabled you will be able to open the labeled file in the Web.

So there you go 2 options to label all the files in an SPO site. Hope this helps!

Microsoft Chrome Extensions

Do you still have users that love their Chrome? Haven’t convinced the org to switch to the new Edge Chromium? Want to make sure the user/security experience with Chrome matches the new features built into edge? Well if you do you are going to need to deploy some Microsoft Chrome Extensions. To help with that I made the below list of Chrome extensions you may want to consider deploying to your users. Let me know if I missed any you deploy?

The Best

Windows 10 Accounts

If you are using AzureAD for Authentication you are going to want this deployed to your Chrome users. With this addon deployed your users will auto be signed in to your Enterprise Apps. Additionally, if you are any device based auth from Win10 you will need this feature to pass the compliance status. https://chrome.google.com/webstore/detail/windows-10-accounts/ppnbnpeolgkicgegkbkbjmhlideopiji?hl=en

Microsoft Compliance Extension

Taking advantage of the great Endpoint DLP features offered with the MSFT compliance stack? Well if you are you should deploy the compliance extension. This gives Chrome the ability to detect what website your end-user is uploading your content to and block based on that. Without this Chrome defaults to blocking all sensitive data from transferring via the browser instead of being able to say upload to corporate SPO is allowed. https://chrome.google.com/webstore/detail/microsoft-compliance-exte/echcggldkblhodogklpincgchnpgcdco

Microsoft Defender Browser Protection / SmartScreen

If you use MDE you should deploy this extension to Chrome. This gives the end-user a warning about why the page they were trying to visit was blocked. This is essentially the equivalent of enabling SmartScreen in Edge. https://chrome.google.com/webstore/detail/microsoft-defender-browse/bkbeeeffjjeopflfhgeknacdieedcoml?hl=en

My Apps Secure Sign-in Extension

My Apps is an underrated extension, its primary focus is user experience. It lets you make the SSO apps readily available to your users. But also has some additional hidden benefits. The first is it makes password-based SSO available for your users, a huge win if you have a Corporate account you want available to your team. The Second is for admins it’s a great tool for debugging SAML Sign-on issues. https://chrome.google.com/webstore/detail/my-apps-secure-sign-in-ex/ggjhpefgjjfobnfoldnjipclpcfbgbhl?hl=en

Deploying Via Intune

Let me pause right here and say the above 4 are the go-to extensions that I think should be deployed. The rest of the list is interesting but are more pocket scenarios that I don’t see a lot of orgs using/wanting. If you decide to use the above apps your next question should be how do I deploy this to my end-users in mass? Well for me the easiest is deploying them via Intune, I used the directions from Lucas Cantor. Ingesting the ADMX for Chrome was very easy. The force deploying of the extensions, not so much. This is because parsing the extensions into the correct form can be difficult. So if you want to deploy the above 4 here is the OMA URI you can use to save yourself some time.

<enabled/> <data id="ExtensionInstallForcelistDesc" value="1&#xF000;ppnbnpeolgkicgegkbkbjmhlideopiji;https://clients2.google.com/service/update2/crx&#xF000;2&#xF000;bkbeeeffjjeopflfhgeknacdieedcoml;https://clients2.google.com/service/update2/crx&#xF000;3&#xF000;echcggldkblhodogklpincgchnpgcdco&#xF000;4&#xF000;ggjhpefgjjfobnfoldnjipclpcfbgbhl"/>

The Rest

One Note Web Clipper

Who doesnt love OneNote? I use this extension all the time to grab parts of articles for reference later. But I dont think all my users would want this. https://chrome.google.com/webstore/detail/onenote-web-clipper/gojbdfnpnhogfdgjbigejoaolejmgdhk

App Guard

App Guard is a very cool feature that you can use in Windows to Virtualize an app into an isolated container. The capability is available in Chrome with this extension. This isn’t in the above list because App Guard can be a very unwieldy deployment, that I just don’t see many orgs using. https://chrome.google.com/webstore/detail/application-guard-extensi/mfjnknhkkiafjajicegabkbimfhplplj?hl=en

Outlook

This is an interesting one, I have used it a little and it’s nice for quickly responding to emails, But mostly i use it for quickly checking what’s coming up in my calendar. https://chrome.google.com/webstore/detail/microsoft-outlook/ajanlknhcmbhbdafadmkobjnfkhdiegm

Office Extension

Similar to the My Apps Extension, this provides a nice way to launch Word and PowerPoint. From a design perspective, this is a superior experience, I wish I could collapse the MySign ins to this one but unfortunately, it doesn’t support all the same features.

https://chrome.google.com/webstore/detail/office/ndjpnladcallmjemlbaebfadecfhkepb?hl=en

Autofill – Non Corporate

This app allows end-users to save passwords in authenticator on their phone then replay them in chrome. This is an interesting app, that I am thinking may add more value in the future. Unfortunately, this is only available for non Corporate Microsoft accounts, so @outlook.com accounts. https://chrome.google.com/webstore/detail/microsoft-autofill/fiedbfgcleddlbcmgdigjgdfcggjcion?hl=en

Should I Integrate SharePoint sharing with Azure AD B2B

I was recently looking at new options available for controlling SharePoint and ran in into an interesting new feature I have never deployed. Specifically the Azure AD B2B integration with SharePoint and OneDrive. Azure AD B2B integration for SharePoint & OneDrive – SharePoint in Microsoft 365 | Microsoft Docs

Seems like an easy enough feature to turn on. Just 2 lines of PowerShell and I am set. But the big question I struggled with when researching this was should I enable this for my tenant? When I do what will be the change in the user experience? Are there any issues/got ya’s when this is enabled? Below I attempt to explorer those questions so you don’t have to.

Long Story Short: You should probably turn the feature on. From a security perspective, you should definitely turn this on. For your guests, it will be a little more cumbersome, but I think the security controls win out. Finally, If you do turn it on I would definitely also integrate AzureAD to support External Identity providers. This will let your users sign in with their external Identity instead of relying on Passcode via email.

Security Benefit: If you enable the B2B integration, you will immediately get a better set of security controls over your guests. The biggest call out is that once you have enabled this, guests are subject to CA policy and all the controls we can do in CA. The largest of these control wins is the ability to MFA these guests. I was surprised to find out that accounts that did not have an AzureAD back(Gmail yahoo etc) defaulted to passcode over email and did not require MFA. The other win inside CA is you can require Terms of Service, this is especially helpful if you need a way for guests to provide consent for GDPR purposes.

Gotchas: The biggest gotcha I can see so far with enabling this is now these guests will show up in Azure AD. Previously if just using the SPO Experience they did not. So if you enable this you will probably get an influx of guests that begin showing in Azure AD. So we need to make sure we have Access Reviews / a cleanup process running regularly to remove these users.

Guest User Experience: Below you will find a side-by-side comparison of the user experience. Overall for a guest, it is a slower experience, Especially if you have Conditional Access Policies in place requiring MFA. Again if you decide to move forward with the Azure AD B2B, consider also enabling External Identity providers.

Default ExperienceAzure AD B2B Enabled


Endpoint DLP PreReq Check

Looking to implement Microsoft’s Endpoint DLP? Concerned you haven’t met the prereqs for deployment? If you have that question then the first place you should check is the Edge URL’s. Microsoft has added a great little utility to help you identify the status of various DLP Utilities. Specifically in this case to check EndPoint DLP status you should visit edge://edge-dlp-internals/

Now, this is a great quick way to identify the status. However, it doesn’t really give us much info on what pre-req is making the product unavailable. I needed this detail recently so I wrote a quick PowerShell script to verify if my endpoint has met the pre-req’s and which one it failed on. If it helps you out Awesome! If it gives you an error let me know so I can help make the script better.

#===========================================================================
# Program: Check Defender status for Endpoint DLP
# Author: Douglas Baker
# Date: 2021-08-26
# Version : 1.0
# Note: https://docs.microsoft.com/en-us/microsoft-365/compliance/endpoint-dlp-getting-started?view=o365-worldwide#prepare-your-endpoints
#
#===========================================================================
#

write-host "Checking Prerequisits for Endpoint DLP"-ForegroundColor Green 
Write-Host "==========================================================" -ForegroundColor Green

$DefenderStatus = Get-MpPreference
$DefenderVersion = Get-MpComputerStatus

if ($DefenderStatus.DisableRealtimeMonitoring -eq $true) {
    Write-Host "Defender Real Time Monitoring is disabled, please enable before using Endpoint DLP" -ForegroundColor Red
} else {
    Write-Host "Defender Real Time Monitoring is enabled" -ForegroundColor Green
}
if ($DefenderStatus.DisableBehaviorMonitoring -eq $true) {
    Write-Host "Defender Behavior Monitoring is disabled, please enable before using Endpoint DLP" -ForegroundColor Red
} Else {
    Write-Host "Defender Behavior Monitoring is enabled" -ForegroundColor Green
}
if ([version]::Parse($DefenderVersion.AMServiceVersion) -le [version]::Parse('4.18.2009.7') ) {
    Write-Host "Defender AV needs to be updated, please updated AM client before using Endpoint DLP" -ForegroundColor Red
} else {
    Write-Host "Defender AV is on version that is supported by Endpoint DLP" -ForegroundColor Green
}
if( [Environment]::OSVersion.Version -lt (new-object 'Version' 10,0,17686) ) {
    write-host "Windows needs to be updated at least version 10x64 Build 1809" -ForegroundColor Red
} else {
    Write-Host "Windows is updated to a supported version" -ForegroundColor Green
}

$dsregcmd = dsregcmd /status
$aad = New-Object -TypeName PSObject
$dsregcmd | Select-String -Pattern " *[A-z]+ : [A-z]+ *" | ForEach-Object {
          Add-Member -InputObject $aad -MemberType NoteProperty -Name (([String]$_).Trim() -split " : ")[0] -Value (([String]$_).Trim() -split " : ")[1] -ErrorAction SilentlyContinue
     }

if ($aad.azureadjoined -eq "no") {
    Write-Host "Windows must be AzureAdJoined for Endpoint DLp to work. Please Join the device to Azure AD" -ForegroundColor Red
} else {
    Write-Host "Windows is AzureAdJoined" -ForegroundColor green
}

Defender for Identity Audit Deleted Objects

So recently I noticed in my new Server 2019 DFI lab I was not getting auditing when an object was deleted. This was curious to me as I have always in the past gotten this type of info from the product. Turns out there is one line I missed on pre-reqs that I have never run into it being an issue before.

Deleted Objects container Recommendation: User should have read-only permissions on the Deleted Objects container. Read-only permissions on this container allow Defender for Identity to detect user deletions from your Active Directory.

Microsoft Defender for Identity prerequisites | Microsoft Docs

I have always just blazed past this note because I go to the root level of the domain granted Read Acces to my service account. This works great everywhere except apparently the Deleted Objects Folder. Turns out that when you enable the Deleted Objects folder it does not by default inherit permissions. Well in this lab it the issue presented itself because I had actually gone in and enabled the AD Recycle Bin, but hadn’t done any customizations. Domain Admins had rights but no other accounts, including my Service Account. So Defender for Identity couldn’t see when an object was moved to that temp container.

You can identify if you have this issue by deleting a test AD account and wait for your portal to update. or by running the below command

#List permissions
dsacls "CN=Deleted Objects,DC=Attack1Lab,DC=local"

Well if you find you have this issue don’t be too alarmed fixing it is pretty easy.

#Give yourself Permissions to modify the container
dsacls "CN=Deleted Objects,DC=Attack1Lab,DC=local" /takeownership
#Give your DFI service account access to read items in the container
dsacls "CN=Deleted Objects,DC=Attack1Lab,DC=local" /g Attack1Lab\srv_ATP:LCRP
#if using GMSA make sure you single quote the command or powershell will convert it to a variable. 
dsacls "CN=Deleted Objects,DC=Attack1Lab,DC=local" /g 'Attack1Lab\gmsa-DFI$:LCRP'

Hope This helps!

Audit All Mailbox Activity

Note: Updated 11/12/2021 to include SearchQueryInitiated

Ever wanted to make sure you are auditing all available activities in Exchange Online? Me too! So I wrote a PowerShell to turn on logging for every possible item EXO can audit. Adjust to your liking and license level!

So why would you want this? Isn’t logging enabled by default in EXO? Well, sort of… According to MSFT documentation, not all available activities are enabled by default. Some of these may be inconsequential, like updating record tags, but some of these like moving an item to a folder or accessing a folder may paint an important picture of activities that happened in a mailbox. The other more important reason you would want to do this is I have noticed EXO does not always enable logging. A few times I have randomly found users with Audit logging disabled, or more commonly during license changes, E3 to E5 upgrades, not all of the Advanced Auditing turns on. Also just as a note to audit everything you will need some version of an E5, see KB articles above.

#Enable global audit logging
Get-Mailbox -ResultSize Unlimited -Filter `
 {RecipientTypeDetails -eq "UserMailbox" -or RecipientTypeDetails -eq "SharedMailbox" -or RecipientTypeDetails -eq "RoomMailbox" -or RecipientTypeDetails -eq "DiscoveryMailbox"} `
 | Select PrimarySmtpAddress `
 | ForEach {$_.PrimarySmtpAddress
    Set-Mailbox -Identity $_.PrimarySmtpAddress -AuditEnabled $true -AuditLogAgeLimit 180 `
    -AuditAdmin   @{add="ApplyRecord","Copy","Create", "FolderBind" , "HardDelete", "MailItemsAccessed",  "Move", "MoveToDeletedItems","RecordDelete", "Send", "SendAs", "SendOnBehalf", "SoftDelete", "Update", "UpdateCalendarDelegation", "UpdateComplianceTag", "UpdateFolderPermissions", "UpdateInboxRules"  } `
    -AuditDelegate @{add="ApplyRecord", "Create", "FolderBind" , "HardDelete", "MailItemsAccessed" , "Move", "MoveToDeletedItems","RecordDelete",  "SendAs", "SendOnBehalf", "SoftDelete", "Update",  "UpdateComplianceTag", "UpdateFolderPermissions", "UpdateInboxRules"  } `
    -AuditOwner  @{add="ApplyRecord", "Create", "HardDelete", "MailItemsAccessed", "MailboxLogin", "Move", "MoveToDeletedItems","RecordDelete", "Send",  "SoftDelete", "Update", "UpdateCalendarDelegation", "UpdateComplianceTag", "UpdateFolderPermissions", "UpdateInboxRules", "SearchQueryInitiated"  }
   }# #

#Double-Check It!
$FormatEnumerationLimit=-1
Get-Mailbox -ResultSize Unlimited | select Name, email, AuditEnabled, AuditLogAgeLimit, Auditowner, auditdelegate, AuditAdmin  | Out-Gridview

Find EOP – MDO Misconfig with KQL

One of the biggest/most common misconfigurations I have seen with EOP/MDO is an overuse of IP or domain allow lists. MSFT has updated its guidelines to no longer recommend customers use those features. However, the hard thing is determining how many emails are coming into your environment without scanning due to those settings. I needed to document this the other day so I went and used the new Microsoft Security Advanced Hunting to get some stats on how big this issue was for my environment. Below are some KQL examples that might help you determine if this is an issue for your environment.

//MDO Org overrides
EmailEvents
| where EmailDirection  == "Inbound"
| where Connectors == ""
| summarize count() by EmailDirection, OrgLevelAction, OrgLevelPolicy

// Domains being allowed
EmailEvents
| where EmailDirection  == "Inbound"
| where Connectors == ""
| where OrgLevelAction == "Allow"
|summarize count() by SenderFromDomain

//User Level overrides
EmailEvents
| where EmailDirection  == "Inbound"
| where Connectors == ""
| summarize count() by EmailDirection, UserLevelAction, UserLevelPolicy

The above KQL is assuming emails that come from a connector should not be scanned. If you need that in this report make sure you just add it in!

Blog Update

Had a lot of life updates since Covid, New Job, New Home all the Covid stuff. As life is starting to normalize again I am again thinking blogging would be fun! And maybe just maybe some of the stuff I post helps someone else. So my goal is to start publishing more on this blog site at least 1 a month. Since it didn’t happen in the past I am going to switch from in-depth blogs to short bite-size pieces of content. Which is really just anything I learn or find helpful, I am going to try and post.

Deploy MDATP Tags with Intune

Do you feel its a little funny that Microsoft doesn’t have a built-in way to deploy MDATP tags Via Intune? Well, so do I! To get around this weakness I went and wrote a little Powershell script to help take care of it. Deploy it via intune script policy and you should be set/manage any regional tags you want in MDATP via intune.

Shout out to the Microsoft Scripting Guy Ed Wilson for the base code to update the values. https://devblogs.microsoft.com/scripting/update-or-add-registry-key-value-with-powershell/

$registryPath = "HKLM:SOFTWARE\Policies\Microsoft\Windows Advanced Threat Protection\DeviceTagging\"

$Name = "Group"
$value = "PowerShellTag"

IF(!(Test-Path $registryPath))

  {
    New-Item -Path $registryPath -Force | Out-Null
    New-ItemProperty -Path $registryPath -Name $name -Value $value -PropertyType String -Force | Out-Null}

 ELSE {
    New-ItemProperty -Path $registryPath -Name $name -Value $value -PropertyType string -Force | Out-Null}
Intune Settings

Let me know if there is an easier way to do this.

MDATP Portal

Export Azure backups in VHD format

Have you ever run into an issue where you need to export a backup of an Azure vm? No? Just me? Okay, well It can be a pain because there is no native way to just get the VHD of the backup file. If you want to restore a backup point, it’s no problem. If you want to clone a machine, no problem! Export a backup that you have already taken, well now that is a lot of work!

The trouble is due to how managed disks work in Azure. Since I am running machines with managed disks, when you restore the backup it retains that format and is only in a format that can be used by Azure. You may have noticed that if you ever pull up Azure file explorer you can’t see any of your vm’s disks, so to get around that you have to convert your managed disks to VHD and copy them to a new storage account.

Here is the hard thing, there is no way in the GUI to do this you have to use power shell if you want to get this to work. Lucky for you here is how you can do it without coming up with another option.

1st go into your Azure backups and restore a backup point. Here you want to create a new restore disk. Make sure to select the

2nd create a new blob you want to copy the VHD exports to. Once created you will need to determine the storage account Name, Container Name, and keys for the blob you plan on using.

You can find most of this info in your storage account.

3rd connect to your Azure environment via power shell.

At this point we need to identify the name or names of the restored disks we want to convert or export.

Use the following script to identify there name based on their creation date.

Connect-AzureRmAccount
get-azurermdisk | sort-object -property timecreated | ft name, TimeCreated

Finally we just need to put it all together and we can export these to our blob and then use storage explorer to download the files.

$disks = 'Disk1','Disk2'
$resourcegroup = 'enter the managed disk resource group name'

foreach ( $diskname in $disks){
$diskname
Get-AzureRmDisk -DiskName $diskname -ResourceGroupName $resourcegroup
$SAS = Grant-AzureRmDiskAccess -DiskName $diskname -ResourceGroupName $resourcegroup -DurationInSecond 58600 -Access Read
# Get the destination details
$storageAccountName = "##theNameof yourBlob##"
$storageContainerName = "##vhd##"
$destinationVHDFileName = $diskname
$storageAccountKey = "##yourkey##"
$destinationContext = New-AzureStorageContext –StorageAccountName $storageAccountName -StorageAccountKey $storageAccountKey
$sas.AccessSAS
# copy the vhd
Start-AzureStorageBlobCopy -AbsoluteUri $sas.AccessSAS -DestContainer $storageContainerName -DestContext $destinationContext -DestBlob $destinationVHDFileName
}

If you are in a time crunch you can monitor the status of the export by using the following code.

foreach ( $diskname in $disks){
$status = Get-AzureStorageBlobCopyState -Blob $destinationVHDFileName -Container $storageContainerName -Context $destinationContext
$percentage = $status.BytesCopied/$status.TotalBytes*100
$percentage = "{0:N2}" -f $percentage
Write-Host -ForegroundColor Yellow "$percentage completed!"
}